Why You’ll Love these Monster Rice Krispies Treats
When Halloween season hits, I’m always on the lookout for treats that deliver maximum visual impact with minimum effort.
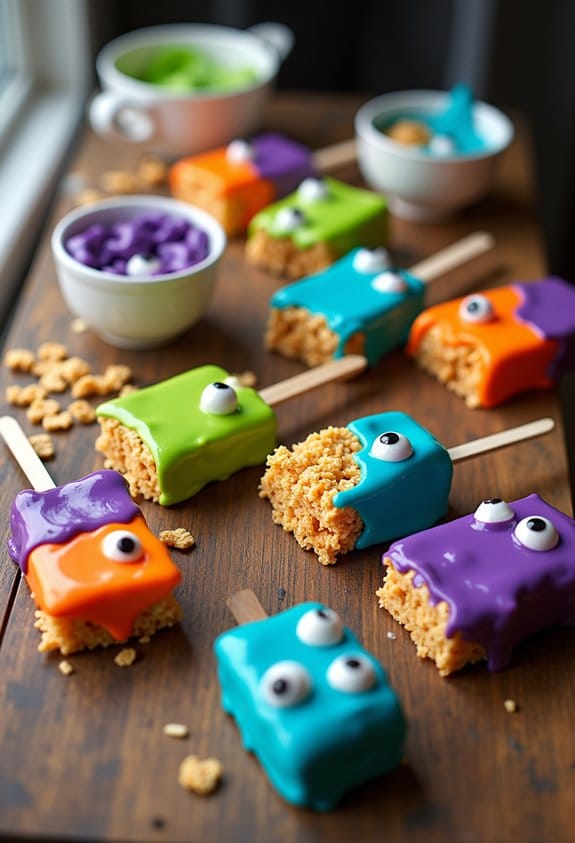
These monster treats are my secret weapon. The vibrant colors and googly eyes transform ordinary Rice Krispies squares into adorable little creatures that kids absolutely devour.
What I love most is their versatility. You can go spooky or silly, depending on your color combinations and eye placement.
Plus, they’re perfect for little helpers—my niece creates the most delightfully bizarre monster faces.
The best part? Unlike elaborate Halloween desserts that take hours, these come together in about 45 minutes, including cooling time.
What Ingredients are in Monster Rice Krispies Treats?
These adorable monster treats use simple pantry staples plus a few special touches that transform them from everyday snacks into Halloween showstoppers. The base is your classic Rice Krispies treat mixture (which, let’s be honest, is already irresistible on its own), but the monster magic happens with the colored chocolate coating and those googly candy eyes that give them personality. I’m particularly fond of using bright, vibrant gel food colors—the more electric the better for creating creatures that pop at your Halloween table.
- 6 cups crisped rice cereal (Rice Krispies)
- 4 cups mini marshmallows (about 8 ounces)
- 3 tablespoons unsalted butter
- 2 cups white chocolate chips or coating wafers
- Gel food coloring (green, purple, blue, or other monster-worthy colors)
- Candy eyes
- Popsicle sticks or sturdy paper straws
- Optional flavor enhancers: 1 teaspoon vanilla or ½ teaspoon almond extract
- Optional mix-ins: ½ cup mini chocolate chips
- Optional decoration: colored jimmies for “monster hair”
When shopping for these ingredients, quality does matter in a few key areas. First, make sure your marshmallows are fresh and soft—stale ones don’t melt as smoothly. For the white chocolate, coating wafers (sometimes called melting wafers or candy melts) actually work better than chips since they’re formulated to melt smoothly without tempering. And remember, only use gel food coloring with chocolate, never liquid food coloring which can make your chocolate seize up faster than you can say “boo!” If you want extra-chewy monsters, you can add another cup of marshmallows to the base, or for firmer treats that hold their shape better at room temperature, add a half cup more cereal.
How to Make these Monster Rice Krispies Treats

Making these adorable monsters is surprisingly easy, even if you’re not exactly crafty (trust me, I’ve managed to botch paper snowflakes).
Start by lining a 9×13-inch pan with parchment paper, leaving some overhang for easy removal later. Give that parchment a light coating of butter or cooking spray—this prevents your treats from staging a sticky rebellion when it’s time to remove them.
In a large pot over medium-low heat, melt your 3 tablespoons of unsalted butter, then add 4 cups of mini marshmallows. This is where patience pays off; stir constantly until the marshmallows transform into a smooth, glossy mixture, but avoid letting it boil, which makes for tough treats.
Once melted, immediately fold in 6 cups of Rice Krispies cereal with a greased spatula, making sure every single piece gets a marshmallow hug. Transfer this mixture to your prepared pan and gently press it into an even layer. The key word here is “gently”—press too hard and you’ll end up with monster bricks instead of treats!
Let these set for about 30 minutes until firm enough to handle.
Now comes the monster transformation. Cut your set treats into approximately 20 rectangles and insert a popsicle stick into one short end of each.
Melt 2 cups of white chocolate chips in a microwave (using 30-second bursts at half power) or over a double boiler until smooth. Divide the melted chocolate between bowls and add gel food coloring to create vibrant monster colors.
Dip the top portion of each treat into your colored chocolate, let excess drip off, then place on parchment paper. While the chocolate is still wet, press candy eyes onto each treat to give them personality.
For extra monster flair, spoon a bit more colored chocolate along the top edge so it drips down like slime. Allow the chocolate to set for 10-15 minutes at room temperature, and voilà—you’ve created a gang of sweet monsters ready to delight (not frighten) your Halloween guests!
Monster Rice Krispies Treats Substitutions and Variations
While the classic recipe creates adorably spooky monsters, you can easily customize these treats to fit your pantry contents or dietary needs.
For a gluten-free version, swap in gluten-free crispy rice cereal. Vegan? Try plant-based butter and vegan marshmallows. Got colored candy melts? Use those instead of tinting white chocolate—much easier, trust me.
I sometimes add a drop of mint extract to green monsters or orange zest to orange ones.
My nephew loves when I mix in crushed cookies for “dirt monsters” with gummy worms on top. The possibilities are endless, and honestly, mistakes just look more monster-like anyway.
What to Serve with Monster Rice Krispies Treats
When planning a monster-themed party or Halloween gathering, your spooky Rice Krispies creatures deserve equally fun accompaniments.
I like to create a “monster munchies” station with green apple slices (zombie fingers, anyone?), purple grape juice “potion,” and blue raspberry punch that matches our colorful treats.
For balance, I serve something savory too—pretzel rod “witch brooms” or cheese cube “monster teeth” on toothpicks. The kids go wild for this contrast.
My secret weapon? A dark chocolate dipping sauce that takes these treats to another level. Perfect for double-dipping those monster pops.
Final Thoughts
These monster-themed Rice Krispies treats have become a staple in my holiday baking rotation because they’re so incredibly versatile and kid-friendly.
I love how they bring smiles to everyone’s faces, from toddlers to grandparents. The beauty lies in their simplicity—basic ingredients transformed into something magical with a few candy eyes and colorful chocolate.
What I appreciate most is how forgiving this recipe is. Having a bad day? Just smash that cereal into the pan.
Need a last-minute party contribution? These come together in under an hour. Best of all, they create memories. Sticky fingers, monster voices, and giggles around the kitchen counter.
Monster Rice Krispies Treats
Ingredients
Equipment
Method
- Line a 9×13-inch pan with parchment paper, leaving overhang for easy removal. Lightly coat the parchment with cooking spray or butter.
- In a large pot over medium-low heat, melt the butter. Add the mini marshmallows and stir constantly until completely melted and smooth. Avoid boiling the mixture.
- Remove from heat and immediately fold in the Rice Krispies cereal with a greased spatula, ensuring all cereal is evenly coated.
- Transfer the mixture to the prepared pan and gently press into an even layer. Don’t press too firmly or treats will become dense.
- Allow the treats to set for about 30 minutes until firm enough to handle.
- Cut the set treats into approximately 20 rectangles and insert a popsicle stick into one short end of each.
- Melt the white chocolate chips in a microwave using 30-second bursts at half power, stirring between intervals, or over a double boiler until smooth.
- Divide the melted chocolate between bowls and add gel food coloring to create vibrant monster colors.
- Dip the top portion of each treat into the colored chocolate, allowing excess to drip off, then place on parchment paper.
- While the chocolate is still wet, press candy eyes onto each treat to create monster faces.
- For extra monster effect, spoon additional colored chocolate along the top edge so it drips down like slime.
- Allow the chocolate to set for 10-15 minutes at room temperature before serving.