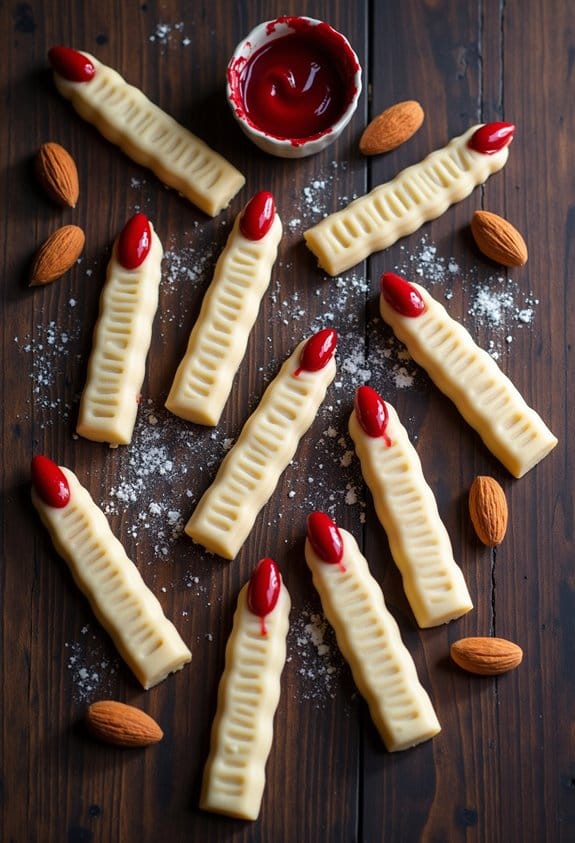
Why You’ll Love these Witch’s Fingers Cookies
These creepy-crawly Witch’s Fingers Cookies are about to become your new Halloween baking obsession. I’ve never seen treats disappear faster at parties—something about biting into a realistic-looking finger just delights the mischievous side in all of us.
What makes them perfect? They’re deceptively simple to make but deliver maximum shock value. The almond extract gives them this subtle, sophisticated flavor that balances the whimsy.
And can we talk about those almond “fingernails” with the red gel “blood”? Absolutely gruesome in the best way possible.
Plus, they keep for days, meaning you can prep ahead and actually enjoy your Halloween gathering.
What Ingredients are in Witch’s Fingers Cookies?
These ghoulishly delightful cookies require surprisingly common ingredients that you probably already have in your pantry. The magic is all in how we shape and decorate them to transform ordinary shortbread-like cookies into severed digits that look frighteningly realistic.
The base is fundamentally a buttery, almond-scented shortbread that holds its shape beautifully during baking, creating the perfect canvas for our macabre creation.
- 1 cup unsalted butter, softened
- 1 cup confectioners’ sugar
- 1 egg
- ½ teaspoon almond extract
- 1 teaspoon vanilla extract
- 2¾ cups all-purpose flour
- 1 teaspoon baking powder
- ½ teaspoon salt
- ¼ cup whole almonds (about 24)
- Red decorating gel
- Optional: green food coloring gel for a ghoulish effect
The quality of your butter matters here—unsalted gives you better control over the final flavor.
And don’t skimp on the extracts, especially the almond, which gives these cookies their distinctive taste that complements the whole almond “fingernails.” Speaking of almonds, try to select ones with a nice oval shape to mimic natural nails.
For a truly hair-raising effect, consider that optional green food coloring to marble through some of the dough, giving your witch’s fingers that decaying, undead look that’ll make your guests both squirm and reach for more.
How to Make these Witch’s Fingers Cookies

Making these eerie witch’s fingers is actually pretty straightforward, though they do require a bit of artistic flair. Start by heating your oven to 350°F and lining two baking sheets with parchment paper.
In a large bowl, cream together 1 cup of softened unsalted butter and 1 cup of confectioners’ sugar for 2-3 minutes until the mixture becomes pale and fluffy. Don’t rush this step—it’s what gives the cookies their tender texture. Add 1 egg, followed by ½ teaspoon of almond extract and 1 teaspoon of vanilla extract, beating until everything is smoothly incorporated.
In a separate bowl, whisk together 2¾ cups of all-purpose flour, 1 teaspoon of baking powder, and ½ teaspoon of salt. Now comes the delicate part—add the dry ingredients to your wet mixture and mix on low speed just until a soft dough forms. Over-mixing here will make your witch fingers tough rather than tender, and nobody wants that.
If your dough feels too soft to work with (which happens on warmer days), pop it in the refrigerator for 15-20 minutes. To shape each finger, scoop about a tablespoon of dough and roll it into a 3½-4 inch log, tapering one end slightly to form a fingertip. Place these spooky digits about 2 inches apart on your prepared sheets.
Now for the gruesome details that make these cookies so memorable. Using a small knife, score three shallow lines across each finger where the knuckles would be. Press a whole almond firmly into the tapered end to create the fingernail.
Bake for 12-14 minutes, rotating the pans halfway through, until the bottoms are lightly golden but the tops aren’t browned. After cooling for 5 minutes, carefully lift each almond, add a thin swipe of red decorating gel underneath, and press the almond back in place.
For extra dramatic effect, add more gel around the cuticles or knuckles. The final touch? If any cookies spread during baking, gently squeeze their sides with a spatula while still warm to refine their finger shape. Trust me, the more realistic they look, the more delightfully horrified your guests will be when they reach for one.
Witch’s Fingers Cookies Substitutions and Variations
Now that you know how to create these spooky digits, let’s explore how to customize them to your own ghoulish vision.
For a truly horrifying twist, try tinting a tablespoon of dough with green food coloring and marbling it into your fingers—perfect for that decaying zombie look.
Not a fan of almonds? Pumpkin seeds make creepy alternative nails, or use sliced pistachios for a greenish tint.
The vanilla-almond flavor is classic, but substituting orange extract creates a surprising citrus note.
For gluten-sensitive ghouls, your favorite cup-for-cup gluten-free flour blend works beautifully.
Want more drama? Dust with powdered sugar “ash” or add blue food coloring for frostbitten fingertips.
What to Serve with Witch’s Fingers Cookies
While your spooky witch’s fingers look delightfully disturbing on their own, pairing them with the right companions creates a complete Halloween spread that’ll have guests cackling with delight.
I love serving these creepy cookies alongside a blood-red punch (cranberry or pomegranate works perfectly) served in a cauldron-style bowl.
For contrast, add some eyeball cake pops or chocolate spiders to the table. A savory balance helps too—try mummy hot dogs or jack-o’-lantern stuffed peppers.
The key is creating visual drama, don’t you think? My personal favorite pairing is a warm apple cider that guests can sip while admiring their gruesome treats.
Final Thoughts
These ghastly witch’s fingers have been my go-to Halloween treat for years, and for good reason. They’re deliciously buttery, perfectly creepy, and always the first to disappear at parties.
The contrast between the sweet shortbread and the gruesome presentation never fails to delight guests of all ages.
What I love most is how customizable they are. Add green food coloring for zombie fingers, swap the almonds for candy corn, or dust with cocoa powder for a dirt effect.
They’re frighteningly simple to make but pack a dramatic punch that store-bought treats just can’t match.
Spooky Witch’s Fingers Cookies
Ingredients
Equipment
Method
- Preheat oven to 350°F and line two baking sheets with parchment paper.
- In a large bowl, cream together the softened butter and confectioners’ sugar for 2-3 minutes until pale and fluffy.
- Beat in the egg, followed by the almond extract and vanilla extract until smoothly incorporated.
- In a separate bowl, whisk together the flour, baking powder, and salt.
- Add the dry ingredients to the wet mixture and mix on low speed just until a soft dough forms. Be careful not to overmix.
- If the dough feels too soft to work with, refrigerate for 15-20 minutes.
- Scoop about a tablespoon of dough and roll it into a 3½-4 inch log, tapering one end slightly to form a fingertip. Place on prepared sheets about 2 inches apart.
- Using a small knife, score three shallow lines across each finger to create knuckles.
- Press a whole almond firmly into the tapered end of each cookie to create the fingernail.
- Bake for 12-14 minutes, rotating the pans halfway through, until the bottoms are lightly golden but the tops aren’t browned.
- After cooling for 5 minutes, carefully lift each almond, add a thin swipe of red decorating gel underneath, and press the almond back in place.
- For extra dramatic effect, add more gel around the cuticles or knuckles.
- If any cookies spread during baking, gently squeeze their sides with a spatula while still warm to refine their finger shape.