
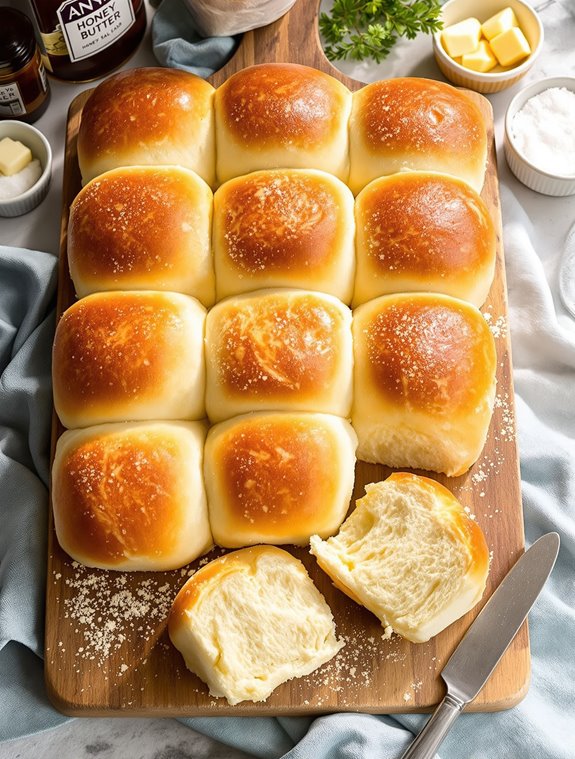
Why You’ll Love these Delicious Hawaiian Rolls
The aroma of fresh-baked Hawaiian rolls is enough to make anyone’s mouth water.
I’m telling you, these pillowy, golden buns with their subtle sweetness will become your new obsession.
What makes them special? That secret ingredient—pineapple juice—which infuses every bite with tropical flavor without being overpowering.
They’re versatile too. Perfect alongside dinner, ideal for sliders, or my personal favorite, torn apart while still warm with a smear of butter.
The soft texture comes from the perfect balance of bread flour and butter.
Trust me, your family will hover around the oven, asking, “Are they done yet?”
What Ingredients are in Delicious Hawaiian Rolls?
These Hawaiian rolls require a handful of simple ingredients that work together to create that signature soft texture and hint of sweetness we all love.
The magic happens when the pineapple juice meets the yeast and flour, creating that distinctive flavor that makes these rolls so special. Ready to gather everything you need for this tropical-inspired bread?
- 1/4 cup milk
- 3 tablespoons butter
- 1 egg (beaten)
- 2 1/4 teaspoons yeast
- 1/2 cup pineapple juice
- 4 tablespoons sugar
- 1/4 teaspoon salt
- 3 1/2 cups bread flour
A few notes about these ingredients—the bread flour is essential for achieving the right structure, so I wouldn’t substitute all-purpose if you can avoid it.
The pineapple juice is truly the star, providing that subtle tropical sweetness without making the rolls taste like a dessert. You can use canned pineapple juice, but make sure it’s 100% juice without added sugars.
Room temperature ingredients will help your yeast activate properly, though you’ll be warming the milk anyway.
And remember, if you’re in a particularly humid climate, you might need to adjust your flour slightly, adding a tablespoon at a time until the dough reaches that perfect, slightly tacky consistency.
How to Make these Delicious Hawaiian Rolls
Making these Hawaiian rolls is surprisingly simple, and the process creates such a wonderful aroma in your kitchen. Start by placing 1/4 cup milk in your mixing bowl and sprinkling in 2 1/4 teaspoons of yeast. Let this mixture sit for about 4-5 minutes until the yeast dissolves—this patience pays off later in fluffiness, trust me.
While that’s happening, grab your 1/2 cup pineapple juice and 3 tablespoons butter, combining them in a microwave-safe container. Heat for about a minute until the butter melts completely. Just remember, this mixture shouldn’t be hotter than 125°F or you’ll accidentally kill your yeast (think comfortable bathwater temperature).
Now for the magic of bringing it all together. Add your beaten egg to the mixing bowl with the milk and yeast. Pour in the warm pineapple juice-butter mixture, along with 4 tablespoons sugar and 1/4 teaspoon salt.
Start incorporating the 3 1/2 cups of bread flour one cup at a time, mixing well after each addition. The dough might need slight adjustments—if it’s still feeling sticky or wet, add flour one tablespoon at a time until it reaches that perfect, slightly tacky consistency.
If you’re using a stand mixer, let the dough hook work for about 10 minutes to develop that gorgeous gluten structure. For the hand-kneading folks (I admire your commitment), turn the dough out onto a lightly floured surface and knead until it becomes smooth and elastic.
There’s something so satisfying about feeling the dough transform under your hands, from sticky and shaggy to smooth and pliable.
Delicious Hawaiian Rolls Substitutions and Variations
While traditional Hawaiian rolls have a distinct flavor profile, you can absolutely play with substitutions to accommodate dietary needs or simply work with what’s in your pantry.
Can’t find pineapple juice? Orange juice works surprisingly well, maintaining that subtle sweetness.
For dairy-free versions, I’ve used coconut milk instead of regular milk with lovely results. The tropical undertones actually complement the rolls beautifully.
Gluten-free bakers might try a 1:1 flour substitute, though you may need to add a bit of xanthan gum for proper texture.
And for a savory twist? I sometimes add a tablespoon of dried herbs or grated Parmesan. So good with soup.
What to Serve with Delicious Hawaiian Rolls
Hawaiian rolls have three perfect pairing categories that’ll transform your dinner table.
First, sliders and sandwiches—I love stuffing these pillowy gems with pulled pork, ham and cheese, or my famous sloppy joes. The slight sweetness creates magic with savory fillings.
Second, they’re ideal bread basket companions for soups and stews. Nothing beats tearing open a warm roll and dipping it into butternut squash soup, right?
Finally, breakfast territory. Split them for mini egg sandwiches or serve alongside scrambled eggs. The pineapple undertones complement morning coffee surprisingly well. Trust me on this one.
Final Thoughts
These homemade Hawaiian rolls have become my absolute favorite weekend baking project.
There’s something magical about the way the pineapple juice creates that signature sweetness without overwhelming the delicate bread flavor. I’ve found that letting the dough rise twice gives them that pillow-soft texture we all crave.
When that aroma fills your kitchen, you’ll understand why I’m so passionate about these rolls. Worth every minute of preparation, don’t you think?
The recipe might seem intimidating at first, but trust me—even my first batch turned out better than store-bought. Your family will beg for these at every gathering.
Homemade Hawaiian Rolls
Ingredients
Equipment
Method
- Place milk in a mixing bowl and sprinkle the yeast over it. Let sit for 4-5 minutes until the yeast dissolves.
- In a microwave-safe container, combine pineapple juice and butter. Heat for about 1 minute until butter melts completely. Ensure the mixture isn’t hotter than 125°F (comfortable bathwater temperature).
- Add the beaten egg to the mixing bowl with the milk and yeast. Pour in the warm pineapple juice-butter mixture, along with sugar and salt.
- Incorporate the bread flour one cup at a time, mixing well after each addition. If the dough feels sticky, add flour one tablespoon at a time until it reaches a slightly tacky consistency.
- If using a stand mixer, let the dough hook work for about 10 minutes to develop the gluten structure. If kneading by hand, turn the dough onto a lightly floured surface and knead until smooth and elastic.
- Place the dough in a greased bowl, cover, and let rise in a warm place until doubled in size, about 1 hour.
- Punch down the dough and divide into 12 equal portions. Shape each portion into a ball and place in a greased baking dish.
- Cover and let rise again until doubled, about 30 minutes. Meanwhile, preheat oven to 350°F.
- Bake for 20-25 minutes or until golden brown on top. Brush with melted butter if desired.


