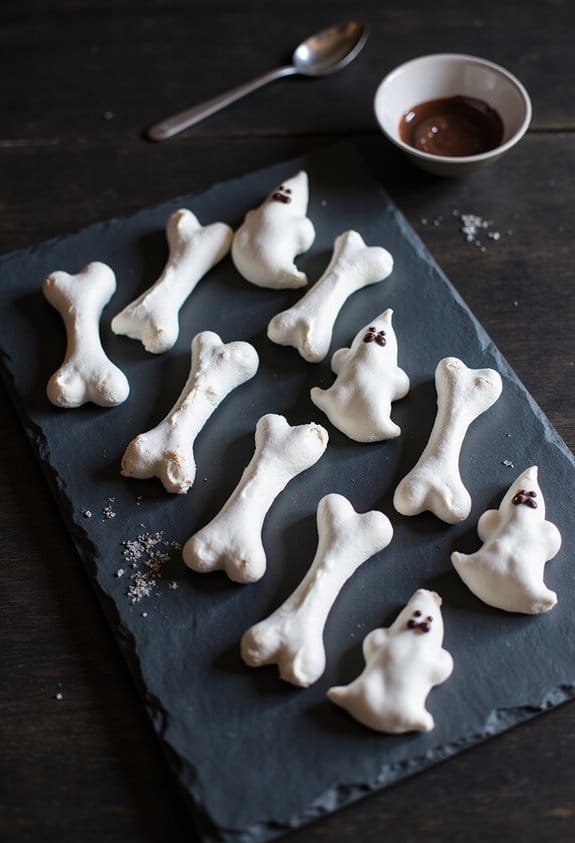
Why You’ll Love these Meringue Bones & Ghosts
These spooky meringue treats are about to become your Halloween party’s star attraction.
I’m obsessed with how they deliver major impact with minimal ingredients – just egg whites, sugar, and a touch of lemon juice. The crisp exterior gives way to a melt-in-your-mouth center that’s impossibly light. Plus, they’re naturally dairy-free and gluten-free, perfect for guests with dietary restrictions.
What I really love? You can make them days ahead. While other desserts demand last-minute attention, these ghostly goodies sit patiently in their airtight container, waiting to wow your guests.
And those little chocolate eyes? Absolutely adorable.
What Ingredients are in Meringue Bones & Ghosts?
Making these spooky meringue treats is surprisingly simple, and you probably have most of the ingredients already sitting in your pantry. The beauty of meringue is how it transforms just a handful of basic ingredients into something magical—crisp on the outside, slightly chewy inside, and completely addictive. The trick lies in the technique rather than complex ingredients, which makes this recipe perfect for home bakers looking to create something impressive without a long shopping list.
- 3 large egg whites, at room temperature
- ¼ teaspoon lemon juice (or cream of tartar as an alternative)
- ¾ cup granulated sugar (superfine sugar works best as it dissolves faster)
- 2 tablespoons melted chocolate or chocolate chips (for the eyes)
Temperature and cleanliness matter enormously with these ingredients. The egg whites must be at room temperature to whip properly, and absolutely no yolk can contaminate them. Even the tiniest bit of grease can prevent your meringue from reaching those beautiful stiff peaks, which is why the recipe recommends wiping down your bowl with vinegar or lemon juice before starting. If you’re looking to add some variation, consider the optional additions like vanilla extract for flavor or cocoa powder for chocolate bones—simple tweaks that can completely transform these ghostly treats without complicating your shopping list.
How to Make these Meringue Bones & Ghosts

Making these spooky meringues starts with proper preparation. Preheat your oven to 225°F and line two baking sheets with parchment paper. If you’re worried about shaping your ghosts and bones freehand, go ahead and draw some guidelines on the underside of the parchment—no shame in that game.
The most essential step before you even crack an egg? Wipe down your mixing bowl and whisk with a bit of vinegar or lemon juice. This removes any lingering grease that could sabotage your meringue’s ability to whip up properly.
Now for the meringue magic. Add your 3 large room-temperature egg whites and ¼ teaspoon of lemon juice to your squeaky-clean bowl. Beat on medium speed until soft peaks form and the mixture looks foamy, which takes about 2-3 minutes.
Then comes the patience test—with the mixer still running, gradually add your ¾ cup of granulated sugar just one tablespoon at a time, taking a full 30-45 seconds to incorporate it all. This slow addition is what creates that perfect meringue texture.
Increase to medium-high speed and continue beating until you see stiff, glossy peaks that stand straight up when you lift the beater. How do you know if the sugar’s dissolved? Rub a little meringue between your fingers—it should feel mostly smooth with minimal grittiness.
Time to get artistic with your piping bag! Transfer the meringue to a piping bag fitted with a round tip (about ½ inch works well). For bones, pipe two round dots for the ends and connect them with a straight line. For ghostly figures, pipe a tall swirl and then pull up at the end to create that classic pointed ghost top.
Space them about an inch apart on your prepared sheets, then bake at 225°F for 60-75 minutes, swapping the trays halfway through. The meringues are done when they feel dry to the touch and lift cleanly from the parchment without sticking.
Don’t rush the cooling process—turn off the oven, crack the door slightly, and let them continue drying for another 45-60 minutes inside. Once completely cool, use your 2 tablespoons of melted chocolate to pipe tiny eyes onto the ghosts (and bones too, if you’re feeling extra creative).
Let the chocolate set for about 10 minutes, and voilà—spooky treats that are as delightful to look at as they’re to eat!
Meringue Bones & Ghosts Substitutions and Variations
While you’ve mastered the basic recipe, let’s explore how to put your own spin on these ghostly treats.
For a vanilla twist, I add ½ teaspoon of vanilla extract during the final minute of whipping. Those subtle notes make all the difference.
Want darker, spookier bones? Try dusting them lightly with cocoa powder before baking—instant fossil effect.
My personal favorite is creating swirled ghosts by striping the inside of the piping bag with melted chocolate before filling it with meringue. The result? Beautifully “smoky” apparitions that look like they’re fading into the night.
These variations transform simple meringues into conversation pieces.
What to Serve with Meringue Bones & Ghosts
These spooky meringue treats deserve equally haunting companions on your Halloween spread.
I love pairing them with dark chocolate fondue, where guests can dip their ghostly confections for a decadent bite. A blood-red raspberry coulis, served in miniature cauldrons, makes for dramatic drizzling.
For balance, offer some savory options—black sesame crackers or purple potato chips.
And don’t forget the drinks! A bubbling punch with dry ice fog or blackberry-tinted lemonade completes the aesthetic.
My personal favorite? Serving these alongside a dark chocolate mousse “graveyard” with cookie crumb “dirt”—pure Halloween magic.
Final Thoughts
Although they require a bit of patience, these ghostly meringue treats will haunt your Halloween gatherings in the most delightful way.
I find there’s something magical about transforming humble egg whites into these crisp, ethereal confections. The delicate crunch giving way to that melt-in-your-mouth sweetness? Pure bliss.
Don’t be intimidated by meringue. With clean equipment and a bit of attention to detail, you’ll master these spooky creations in no time.
And when guests ask where you bought them? That little smile knowing you made them yourself is worth every minute spent piping. Happy haunting!
Spooky Meringue Bones & Ghosts
Ingredients
Equipment
Method
- Preheat your oven to 225°F (107°C) and line two baking sheets with parchment paper. For easier shaping, you can draw guidelines on the underside of the parchment paper.
- Wipe down your mixing bowl and whisk attachment with vinegar or lemon juice to remove any traces of grease that could prevent proper whipping.
- Add the room temperature egg whites and lemon juice to your clean bowl. Beat on medium speed until soft peaks form and the mixture looks foamy, about 2-3 minutes.
- With the mixer still running, gradually add the granulated sugar one tablespoon at a time, taking 30-45 seconds to incorporate it all. This slow addition creates the perfect meringue texture.
- Increase to medium-high speed and continue beating until stiff, glossy peaks form that stand straight up when you lift the beater. The meringue should feel mostly smooth between your fingers with minimal grittiness.
- Transfer the meringue to a piping bag fitted with a round tip (approximately ½ inch diameter).
- For bones: Pipe two round dots for the ends and connect them with a straight line. For ghosts: Pipe a tall swirl and then pull up at the end to create a pointed ghost top.
- Space the shapes about an inch apart on your prepared baking sheets.
- Bake at 225°F for 60-75 minutes, swapping the trays halfway through. The meringues are done when they feel dry to the touch and lift cleanly from the parchment without sticking.
- Turn off the oven, crack the door slightly, and let the meringues continue drying for another 45-60 minutes inside the cooling oven.
- Once completely cool, use the melted chocolate to pipe tiny eyes onto the ghosts and bones if desired.
- Allow the chocolate to set for about 10 minutes before serving or storing.