Why You’ll Love these Skeleton Cookies
Whether you’re planning a Halloween party or just want to add some spooky charm to your fall baking, these skeleton cookies are guaranteed to steal the show.
I love how these cookies strike the perfect balance—they’re detailed enough to impress but simple enough that anyone can make them, baking skills notwithstanding.
The almond-vanilla flavor elevates them beyond typical sugar cookies. Trust me, that hint of almond makes all the difference.
And can we talk about those clean edges? The brief chilling time means your skeletons won’t lose their shape in the oven. Perfect for making memories with kids or serving at grown-up gatherings.
What Ingredients are in Skeleton Cookies?
These skeleton cookies start with a classic sugar cookie base that’s been elevated with a hint of almond extract—it’s this little touch that makes them taste like they came from a fancy bakery rather than your kitchen.
The dough strikes that perfect balance between sturdy enough to hold its shape when cut into skeleton figures, yet tender enough to melt in your mouth. And the best part? You probably have most of these ingredients in your pantry already.
- ¾ cup granulated sugar
- ½ cup unsalted butter, softened
- 2 large eggs
- 1 teaspoon vanilla extract
- 1 teaspoon almond extract
- 3 cups all-purpose flour
- 2 teaspoons baking powder
- ½ teaspoon salt
When it comes to the extracts, don’t skip the almond if you can help it. It’s what gives these cookies their signature bakery-style flavor that elevates them above ordinary sugar cookies.
If you’re not a fan of almond or have an allergy in the house, you can certainly substitute with additional vanilla extract. For the icing, you’ll need confectioners’ sugar, milk, corn syrup, and vanilla for the white base, plus black gel food coloring for the details—but we’ll get into those specifics in the next section.
The quality of your butter matters too; a good unsalted butter will give you that rich, clean flavor that makes these cookies irresistible.
How to Make these Skeleton Cookies

Making these spooky skeleton cookies is surprisingly straightforward. Start by preheating your oven to 350°F and lining two baking sheets with parchment paper—trust me, the parchment makes all the difference for easy cleanup.
In a medium bowl, whisk together 3 cups of all-purpose flour, 2 teaspoons of baking powder, and ½ teaspoon of salt, then set this mixture aside. This is one of those recipes where mise en place (having everything ready before you start) really helps the process flow smoothly.
Now for the wet ingredients. In a large bowl, beat ½ cup of softened unsalted butter with ¾ cup of granulated sugar until the mixture becomes light and fluffy, about 2-3 minutes. Don’t rush this step—it’s what gives your cookies that perfect texture.
Add 2 large eggs one at a time, beating well after each addition, then mix in 1 teaspoon of vanilla extract and 1 teaspoon of almond extract. The almond extract is what gives these cookies that bakery-quality flavor we’re after.
Gradually mix the dry ingredients into the wet on low speed just until a soft dough forms. Remember, overmixing is the enemy of tender cookies, so stop as soon as everything comes together. If the dough feels sticky, you can add an extra tablespoon or two of flour.
The secret to perfectly shaped skeleton cookies? Chilling the dough. Divide your dough in half, press each piece into a flat disk between parchment sheets, and chill for 20-30 minutes. This makes the dough much easier to work with.
Roll the chilled dough to ¼ inch thickness and cut out your skeleton shapes, placing them an inch apart on your prepared baking sheets. For extra-clean edges (which really matter when you’re making detailed shapes like skeletons), pop the cut cookies into the freezer for 5-10 minutes before baking.
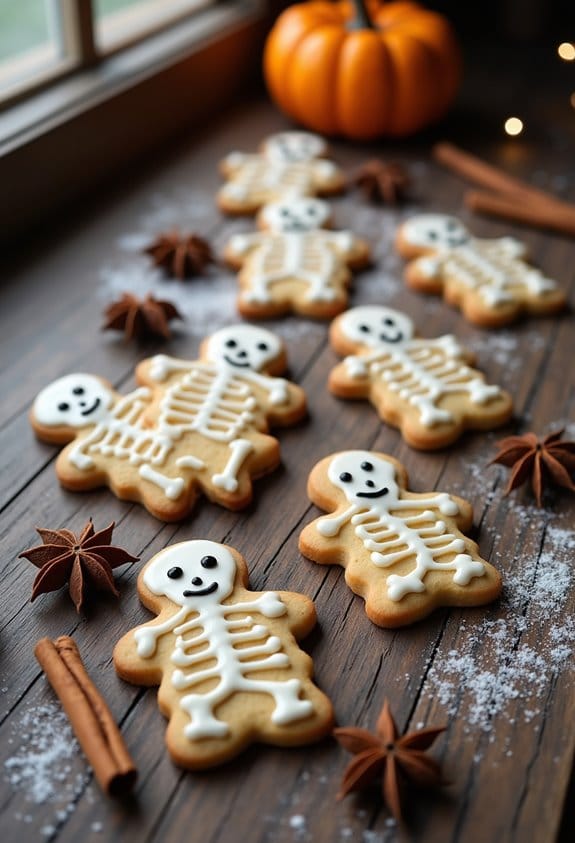
Bake at 350°F for 8-11 minutes—you’re looking for set edges and bottoms that are just turning light golden, but the tops should remain pale. After cooling, pipe white royal icing for the bones and skull faces, let set for 20-30 minutes, then add black gel details for eyes, smiles, and teeth.
The contrast between the white bones and black details creates that classic skeleton look that’s both spooky and adorable.
Skeleton Cookies Substitutions and Variations
While the classic skeleton cookie recipe creates delightfully spooky treats, you can easily customize these cookies to suit your taste preferences or dietary needs.
I often swap the almond extract for extra vanilla when baking for friends with nut allergies—works perfectly! For a citrusy twist, try adding orange or lemon zest to the dough.
Feeling adventurous? A dash of cinnamon or cardamom gives these skeletons unexpected warmth.
Need a gluten-free version? I’ve had great success with cup-for-cup gluten-free flour blends.
And if you’re looking for cleaner bone lines in your decorating, those small round piping tips (#2 or #3) are absolute game-changers.
What to Serve with Skeleton Cookies
Serving these spooky skeleton cookies calls for equally festive companions to complete your Halloween spread.
I love pairing them with a mug of hot apple cider—the warm cinnamon notes complement the almond in the cookies perfectly. For a midnight snack table, try adding dark chocolate-dipped strawberries (ghost white against deep red, very on theme) and a bowl of candy corn.
Need a drink option? Blood-red punch served in a cauldron never disappoints.
My niece always requests “bone milk”—just regular milk with a drop of vanilla in clear glasses. Simple but effective.
The contrast of white cookies against darker treats creates an eye-catching display.
Final Thoughts
These skeleton cookies have become a Halloween tradition in my home, bringing joy to both kids and adults year after year.
The combination of almond and vanilla extracts gives them that classic bakery flavor that’s simply irresistible. I love how versatile they are—sometimes I’ll add orange zest for a citrusy twist, other times a dash of cinnamon for warmth.
What I appreciate most is how these cookies create memories. There’s something magical about gathering around the kitchen table, decorating bones and skulls while sharing stories.
Isn’t that what holiday baking is truly about? Connection, creativity, and cookies.
Skeleton Cookies
Ingredients
Equipment
Method
- Preheat oven to 350°F and line two baking sheets with parchment paper.
- In a medium bowl, whisk together flour, baking powder, and salt. Set aside.
- In a large bowl, beat softened butter with sugar until light and fluffy (2-3 minutes).
- Add eggs one at a time, beating well after each addition.
- Mix in vanilla extract and almond extract.
- Gradually mix dry ingredients into wet ingredients on low speed just until a soft dough forms.
- Divide dough in half, press each piece into a flat disk between parchment sheets, and chill for 20-30 minutes.
- Roll chilled dough to ¼ inch thickness and cut out skeleton shapes.
- Place cookies 1 inch apart on prepared baking sheets.
- Optional: Freeze cut cookies for 5-10 minutes before baking for cleaner edges.
- Bake for 8-11 minutes until edges are set and bottoms are light golden (tops should remain pale).
- Let cool completely before decorating with white royal icing for bones and skull faces.
- Allow icing to set for 20-30 minutes, then add black gel details for eyes, smiles, and teeth.