Why You’ll Love these Spider Web Cupcakes
When you’re looking for a show-stopping Halloween treat that won’t require a culinary degree, these spider web cupcakes are your new best friend. I love how they combine convenience with serious wow-factor.
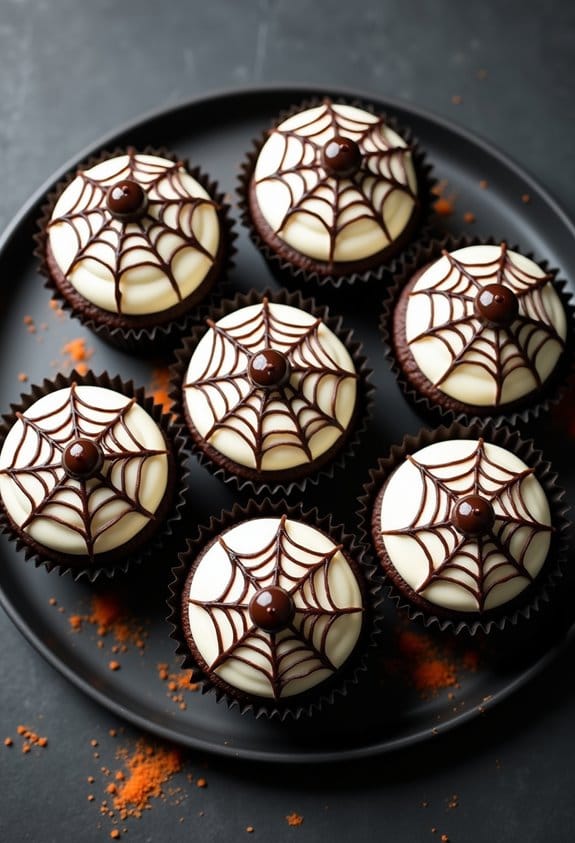
The semi-homemade approach saves time without sacrificing style. Trust me, guests will think you spent hours on these spooky masterpieces. The stark contrast between dark chocolate webs and white frosting creates dramatic visual appeal that’s perfect for Halloween parties.
My favorite part? The technique is actually forgiving. Made a wobbly line? No problem—just call it a “haunted” web. And those optional chocolate spiders? Absolutely adorable, in a creepy-crawly way.
What Ingredients are in Spider Web Cupcakes?
These spider web cupcakes rely on a mix of store-bought shortcuts and simple ingredients to create a dessert that looks way more complicated than it actually is.
The beauty of this recipe is that you can make it as homemade or as convenient as you want, depending on how much time you have and your comfort level in the kitchen. Most of the ingredients are probably already in your pantry or can be grabbed during a quick trip to the grocery store.
- 1 box chocolate cake mix
- Ingredients called for on the cake mix box (typically eggs, oil, and water)
- 1 tub vanilla frosting (or 3 cups homemade if you’re feeling ambitious)
- ¼ cup chocolate chips or melting wafers
- ½ teaspoon neutral oil (like vegetable or canola oil)
- Optional for spiders: mini chocolate candies or malted milk balls
- Cupcake liners
- Toothpicks (for creating the web design)
While the recipe is pretty straightforward, there are a few ingredient considerations worth noting.
If you’re using store-bought frosting but want a smoother consistency for piping, you can microwave the tub for just 5-8 seconds to loosen it up—this little trick makes a world of difference in how professionally your cupcakes turn out.
And don’t skip the neutral oil when melting your chocolate; it thins the consistency just enough to make piping those delicate web lines much easier.
For those with dietary restrictions, many cake mixes now come in gluten-free or vegan varieties, and you can always substitute the frosting with dairy-free alternatives that will work just as well for this spooky design.
How to Make these Spider Web Cupcakes

Making these spooky treats is surprisingly simple, even for those of us who typically struggle with “fancy” decorating.
Start by preheating your oven to 350°F and lining two standard muffin tins with paper liners. Prepare 1 box of chocolate cake mix according to the package directions (usually involving eggs, oil, and water), then divide the batter among your 24 cupcake liners, filling each about two-thirds full. Bake for 18-22 minutes until the tops spring back when lightly touched and a toothpick inserted in the center comes out clean. Let these little beauties cool in the pan for about 5 minutes before transferring them to a cooling rack to cool completely—patience is key here, as frosting warm cupcakes is a disaster waiting to happen.
Once your cupcakes have cooled, swirl on the vanilla frosting (either 1 tub of store-bought or 3 cups homemade) using a piping bag with a round tip for the smoothest surface. A little pro tip? Chill these frosted cupcakes for about 10 minutes, which helps the chocolate web design set more neatly.
While they’re chilling, melt ¼ cup chocolate chips or melting wafers with ½ teaspoon neutral oil in a microwave-safe bowl, heating in short 15-20 second bursts and stirring in between until smooth. Transfer this melted chocolate to a zip-top bag or piping bag and snip a tiny tip.
Now for the fun part—pipe 3-4 concentric circles on each cupcake, then immediately drag a toothpick from the center to the edge (wiping the tip between pulls) to create 6-8 “spokes” that transform those circles into a web. For extra Halloween flair, place a mini chocolate candy in the center as a spider body, pipe a small dot for the head, and draw 8 thin chocolate legs.
Let the chocolate firm up for 10-15 minutes before serving or storing these creepy-cute creations.
Spider Web Cupcakes Substitutions and Variations
Now that you’ve mastered the basic spider web technique, let’s explore some fun ways to customize these spooky treats!
Try using different frosting colors for a twist—orange creates perfect Halloween vibes, while purple adds mystical flair.
Feeling adventurous? Replace vanilla frosting with cream cheese or chocolate for deeper flavor profiles.
For the web itself, white chocolate works beautifully against darker frostings, and adding a drop of food coloring to your melted chocolate creates colorful webs.
My niece loves when I add edible glitter for “dew drops” on the web.
Can’t find mini chocolate candies for spiders? Chocolate-covered raisins or even gumdrops work in a pinch.
What to Serve with Spider Web Cupcakes
When planning a Halloween gathering, your spider web cupcakes deserve equally festive companions on the dessert table.
I love serving them alongside bubbling witch’s brew punch (apple cider with dry ice for that spooky fog effect) and candy corn parfaits.
For a balanced spread, include savory options like mummy hot dogs wrapped in pastry bandages or cheesy breadstick “bones” with marinara dipping sauce.
Need more sweet treats? Try chocolate-dipped strawberry “ghosts” or caramel apples rolled in crushed nuts—they complement the cupcakes without stealing their spotlight.
Final Thoughts
These spider web cupcakes have become my Halloween party signature for good reason. They strike that perfect balance between impressive-looking and actually doable, even for those of us who aren’t pastry chefs.
The chocolate webs set beautifully against the white frosting, creating that spooky-elegant vibe that Halloween deserves.
What I love most? The versatility. You can make them super simple with just the webs, or go all out with the little spider friends perched on top.
Trust me, your guests will be snapping photos before devouring them. Baking magic at its most accessible.
Spider Web Cupcakes
Ingredients
Equipment
Method
- Preheat oven to 350°F and line two standard muffin tins with paper liners.
- Prepare chocolate cake mix according to package directions, typically using eggs, oil, and water.
- Divide batter among 24 cupcake liners, filling each about two-thirds full.
- Bake for 18-22 minutes until tops spring back when lightly touched and a toothpick inserted in the center comes out clean.
- Cool cupcakes in the pan for 5 minutes before transferring to a cooling rack to cool completely.
- Once cupcakes have cooled, swirl vanilla frosting on top using a piping bag with a round tip for the smoothest surface.
- Chill frosted cupcakes for about 10 minutes to help the chocolate web design set more neatly.
- While cupcakes chill, melt chocolate chips or wafers with neutral oil in a microwave-safe bowl, heating in 15-20 second intervals and stirring between until smooth.
- Transfer melted chocolate to a zip-top bag or piping bag and snip a tiny tip.
- Pipe 3-4 concentric circles on each cupcake.
- Immediately drag a toothpick from the center to the edge (wiping the tip between pulls) to create 6-8 “spokes” that transform the circles into a web pattern.
- Optional: Place a mini chocolate candy in the center as a spider body, pipe a small dot for the head, and draw 8 thin chocolate legs.
- Allow the chocolate to firm up for 10-15 minutes before serving or storing.