
The best mini cakes recipe delivers customizable, portion-perfect desserts for any celebration.
These petite treats are ideal for intimate gatherings, personalized gifts, or any moment when you want something special without the leftovers. Each person gets their own perfectly portioned cake, which means no fighting over corner pieces and no sad, dried-out slices lingering in the fridge three days later. You can bake two 4-inch cakes or four ramekin-sized cakes from one batch, making this recipe wonderfully flexible for different occasions.
The real charm here is customization. Want one cake vanilla and another chocolate? Go for it. Planning a smash cake for a first birthday alongside adult-friendly flavors for the party? Easy. Because each cake bakes and decorates independently, you can tailor colors, frostings, and toppings to suit every guest or theme without doubling your work.
This recipe relies on buttermilk, sour cream, and oil to guarantee a moist crumb that stays tender even after chilling. The optional Instant Clearjel stabilizes whipped cream frosting so it holds up beautifully during decorating and serving, which is especially helpful if you are working in a warm kitchen or transporting cakes to an event.
What Goes Into the Best Mini Cakes
Because mini cakes bake faster and hold less batter, the ingredient lineup focuses heavily on moisture and tenderness.
- Cake flour or all-purpose flour – provides structure without making the crumb tough or heavy.
- Buttermilk – adds tang and keeps the texture soft and fluffy.
- Sour cream – contributes richness and moisture without weighing down the batter.
- Neutral oil – keeps the cake tender even when chilled, unlike butter which can firm up in the fridge.
- Eggs – bind the batter and add structure for clean slicing.
- Apple cider vinegar – reacts with the buttermilk to create a light, airy crumb.
- Heavy whipping cream – forms the base of a simple, lightly sweet frosting.
- Instant Clearjel – stabilizes whipped cream so it holds its shape during decorating and serving.
- Vanilla extract or paste – adds warmth and depth to both the cake and frosting.
- Gel food coloring – allows for vibrant, customizable colors without thinning the batter.
How to Bake and Assemble Mini Cakes Step by Step
STEP 1: Preheat your oven to 350°F and prepare two 4-inch pans, four ramekins, or a quarter-sheet pan with parchment paper and baking spray.
STEP 2: Combine the dry ingredients in one bowl and the wet ingredients in another, then mix them together using a two-bowl method or reverse creaming technique to avoid overmixing and ensure a tender crumb.
STEP 3: Pour the batter evenly into your chosen pans and bake for 18 to 22 minutes for 4-inch pans, or 15 to 18 minutes for a sheet cake, until a toothpick inserted into the center comes out clean.
STEP 4: Let the cakes cool in the pans for 10 minutes, then wrap tightly in plastic wrap and freeze the layers to prevent crumbling during assembly.
STEP 5: Level the frozen cake layers horizontally with a serrated knife so they stack evenly without wobbling or tilting.
STEP 6: Whip the heavy cream with vanilla and Instant Clearjel until stiff peaks form, then stack the layers with frosting between each one and apply a thin crumb coat.
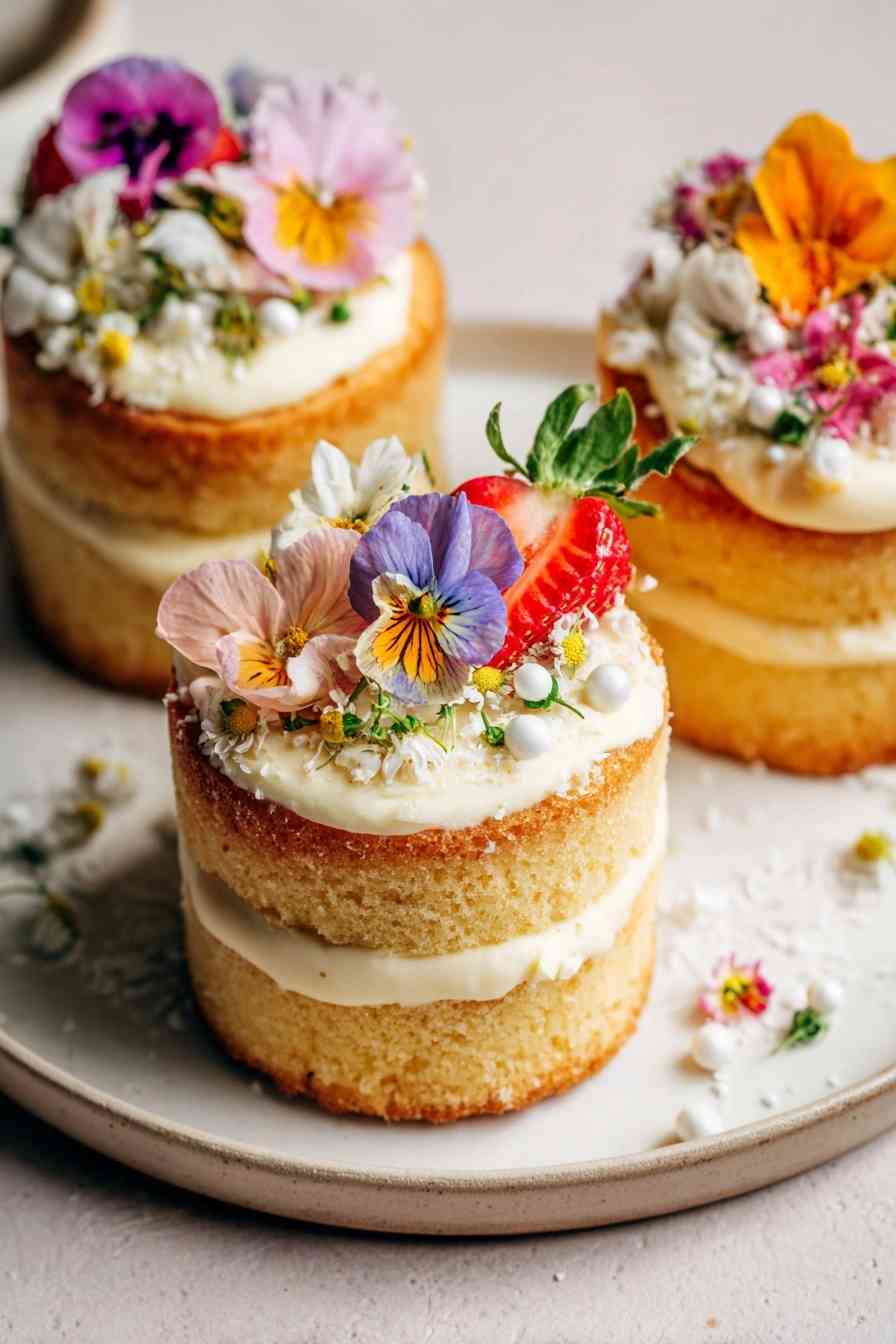
STEP 7: Chill for 15 minutes, then apply the final frosting layer and decorate using a piping tip, fresh berries, or edible flowers.
STEP 8: If using the sheet cake method, cut out small rounds using 2 to 3-inch cookie cutters after cooling, then assemble and decorate as directed above.
Mini Cake Success: Tricks for Tender, Moist Layers

- Use room temperature eggs, buttermilk, and sour cream so the batter emulsifies smoothly and bakes evenly without dense pockets.
- Freeze the layers before assembly. Frozen cake is far easier to level and frost without tearing or leaving crumbs in the frosting.
- Check for doneness a few minutes early. Mini cakes bake faster than full-size layers, and overbaking by even two minutes can lead to dry, crumbly results.
- If omitting Instant Clearjel, keep frosted cakes chilled until just before serving to prevent whipped cream from softening or sliding.
Creative Ways to Serve and Present Mini Cakes
- Serve each cake on a small dessert plate with a dollop of whipped cream and fresh berries for a classic, elegant presentation.
- Top with colorful sprinkles, crushed cookies, or a drizzle of caramel or chocolate ganache for a playful approach.
- Arrange the cakes on a tiered stand at a party so guests can choose their own flavors and decorations.
- Pair with coffee, tea, or champagne depending on the occasion and time of day.
Mini Cakes FAQ: Baking, Customizing, and More
Can I use regular all-purpose flour instead of cake flour?
Yes, all-purpose flour works well in this recipe. The texture will be slightly sturdier than with cake flour, but the buttermilk and sour cream still deliver a soft, moist crumb. If you want to mimic cake flour more closely, remove two tablespoons of all-purpose flour and replace them with cornstarch.
How do I make these mini cakes gluten-free or vegan?
For a gluten-free version, substitute the cake flour with a 1:1 gluten-free baking blend that contains xanthan gum. For vegan cakes, replace each egg with a quarter cup of applesauce and use plant-based sour cream and milk. The texture will be slightly denser but still tender and flavorful.
What’s the best way to decorate mini cakes for different events?
For birthdays, use bright gel colors and top with sprinkles or candles. For anniversaries or date nights, keep the frosting neutral and add fresh flowers or berries. For baby showers, pastel colors and delicate piping work beautifully. The small size makes it easy to experiment with different styles without committing to a full cake.
Can I make mini cakes ahead and freeze them?
Absolutely. Wrap unfrosted layers tightly in plastic wrap and freeze for up to three months. Thaw them in the fridge overnight, then frost and decorate as usual. Frosted cakes can also be frozen, but wrap them carefully and add decorations after thawing to keep them looking fresh.
How do I prevent mini cakes from drying out?
Avoid overbaking by checking doneness a few minutes early, and use oil instead of butter to keep the crumb soft even when chilled. Store finished cakes in an airtight container in the fridge, and bring them to room temperature about 20 minutes before serving for the best texture and flavor.
Storing and Freezing Mini Cakes for Freshness
Refrigerator: Store frosted mini cakes in an airtight container for up to four days. If you used whipped cream frosting without Instant Clearjel, keep them chilled at all times to prevent the frosting from softening.
Freezer: Wrap unfrosted layers tightly in plastic wrap and freeze for up to three months. Thaw overnight in the fridge before frosting. Frosted cakes can also be frozen, but wrap them carefully and add delicate decorations after thawing to avoid damage.
Reheating: Bring chilled cakes to room temperature about 20 minutes before serving for the best texture and flavor.
The Best Mini Cakes Recipe for Every Event
Ingredients
Equipment
Method
- Preheat oven to 350°F (175°C). Prepare either two 4-inch cake pans, four 6-ounce ramekins, or a quarter-sheet pan by lining with parchment paper and lightly greasing with baking spray.
- In one bowl, stir together the flour. In a separate bowl, whisk together the buttermilk, sour cream, oil, apple cider vinegar, and eggs until smooth.
- Use either the two-bowl combination or reverse creaming method to mix the dry and wet ingredients until just combined, creating a batter for a tender crumb.
- Divide the batter evenly between your prepared pans. For 4-inch cake pans, bake for 18–22 minutes, or until a toothpick inserted into the center of the cakes comes out clean.
- Remove cakes from the oven and let them cool in the pans for 10 minutes. Then, wrap each layer tightly in plastic wrap while still warm and freeze until ready to assemble to help prevent crumbling.
- If you baked a sheet cake, bake for 15–18 minutes, then let it cool. Use cookie cutters (2–3 inch) to cut out small rounds.
- Once the cake layers are frozen, trim the tops with a serrated knife to level them for easy stacking.
- To make the frosting, whip chilled heavy cream with vanilla and, if using, Instant Clearjel until stiff peaks form. Add gel food coloring if desired.
- Stack the mini cake layers with whipped cream frosting between each layer. Apply a thin 'crumb coat' of frosting and chill the cakes for 15 minutes to set.
- Decorate the cakes as you like using a piping tip, fresh berries, or edible flowers. This recipe yields two 4-inch cakes or four small ramekin cakes.