
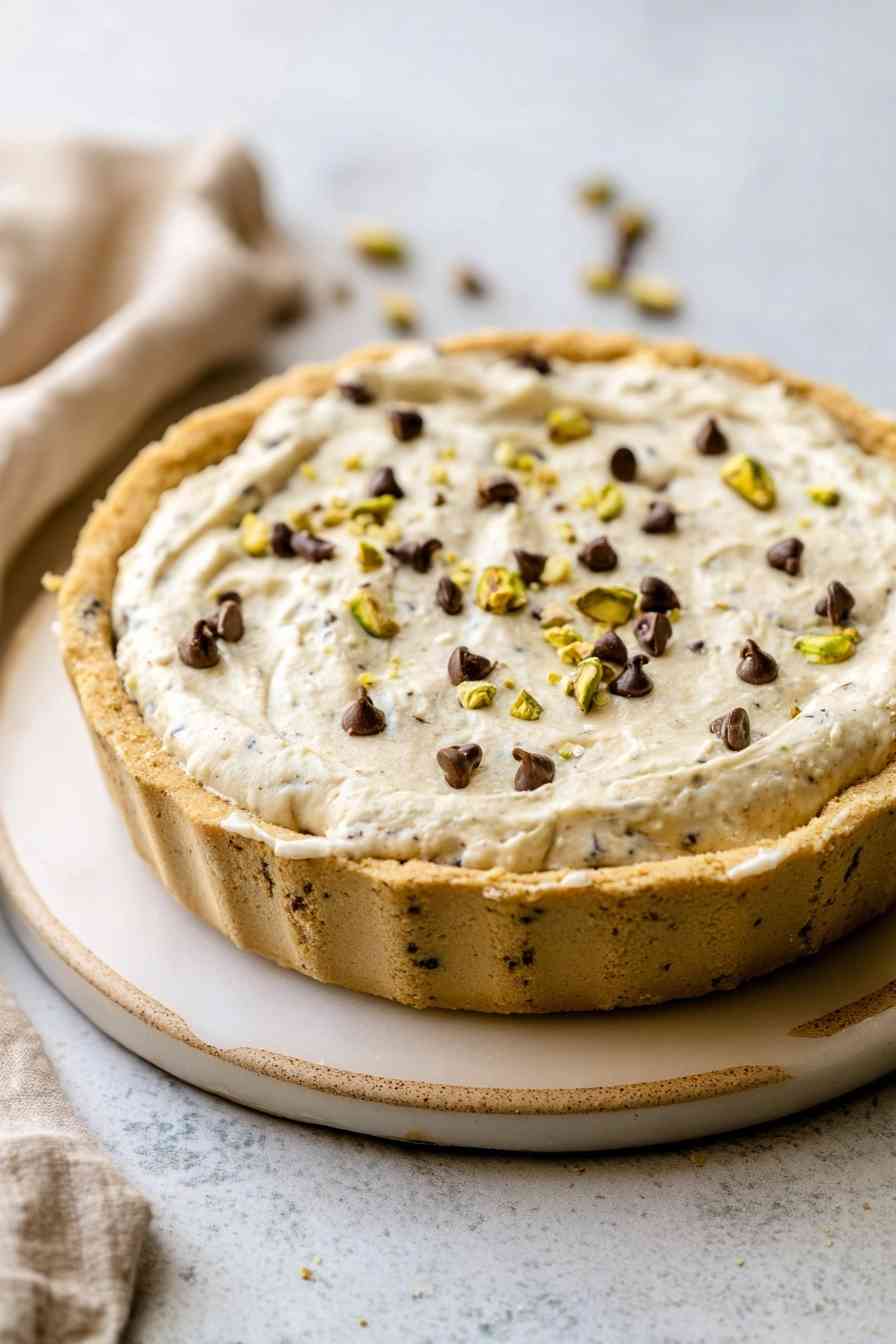
No-Bake Cannoli Cheesecake transforms classic cannoli flavors into a creamy, chilled dessert.
If you love the creamy ricotta filling and chocolate chips tucked into a classic cannoli, this cheesecake gives you all of those flavors in a sliceable, make-ahead dessert. The filling blends ricotta, mascarpone, and cream cheese with whipped cream folded in, creating a light and airy texture that still slices cleanly after a long chill. Orange zest and mini chocolate chips finish it off with that familiar Italian bakery flavor.
The vanilla wafer crust gets a quick bake or chill, and the filling comes together without turning on the oven again. No stress about cracks, no fussing with a water bath, just whip, fold, spread, and let the fridge do the rest. It’s an easy dessert to prepare a day ahead for spring gatherings, holidays, or any time you want something a little more special than a standard cheesecake.
What Goes Into No-Bake Cannoli Cheesecake
This cheesecake pulls together classic cannoli flavors with a few smart ingredient choices that keep the filling creamy and stable.
- Vanilla wafers – crushed finely and mixed with melted butter to form a sweet, sturdy crust that holds up well after chilling or a short bake.
- Whole-milk ricotta – provides the signature cannoli flavor and creamy texture, but it must be drained very well to avoid a runny or grainy filling.
- Mascarpone – adds richness and a silky mouthfeel that balances the ricotta’s slight graininess.
- Cream cheese – gives the filling structure and helps it set firmly enough to slice cleanly after chilling.
- Heavy cream – whipped to medium peaks and folded in, creating an airy, mousse-like texture that keeps the filling from feeling too dense.
- Orange zest – brings a bright, citrusy note that’s classic in traditional cannoli fillings and cuts through the richness.
- Mini chocolate chips – scattered throughout the filling for little bursts of chocolate in every bite, just like a classic cannoli.
- Confectioners’ sugar – sweetens the filling without adding graininess, and dissolves smoothly into the dairy mixture.
- Vanilla and almond extracts – round out the flavor with warmth and a subtle almond note that enhances the Italian bakery vibe.
Step-by-Step: Building Your Cannoli Cheesecake
STEP 1: Mix the crushed vanilla wafers with melted butter and optional sugar, then press the mixture firmly into the bottom and slightly up the sides of a 9-inch springform pan. Bake at 350°F for 8 to 10 minutes or chill for 20 to 30 minutes to set the crust.
STEP 2: Whip the heavy cream in a large bowl to medium peaks, then refrigerate it while you prepare the rest of the filling.
STEP 3: Beat the ricotta, cream cheese, and mascarpone together with an electric mixer on medium speed until completely smooth and no lumps remain.
STEP 4: Mix in the confectioners’ sugar, orange zest, vanilla extract, and almond extract if using, beating until fully combined.
STEP 5: Fold about a quarter of the whipped cream into the ricotta mixture to loosen it, then gently fold in the remaining whipped cream until the filling is light, fluffy, and evenly combined.
STEP 6: Fold in the mini chocolate chips, then spread the filling into the prepared crust and smooth the top.
STEP 7: Chill the cheesecake for at least 6 hours or overnight for the cleanest slices and best texture. Garnish with whipped cream, chopped pistachios, and more mini chocolate chips just before serving.
Secrets for the Dreamiest Cannoli Cheesecake Filling
- Drain the ricotta thoroughly. Place the ricotta in a fine-mesh strainer lined with cheesecloth or paper towels, set it over a bowl, and let it drain in the fridge for at least an hour or overnight. Excess moisture will make the filling runny and prevent it from setting properly.
- Stop whipping at medium peaks. Over-whipped cream turns grainy and heavy, making the filling dense instead of airy. Aim for soft, floppy peaks that just hold their shape when you lift the beaters.
- Fold gently and deliberately. Use a spatula to cut down through the center of the mixture, sweep along the bottom, and fold up and over. Repeat until no streaks remain, but don’t stir or beat, or you’ll deflate the whipped cream.
- Chill overnight if you can. The cheesecake will technically set after 6 hours, but an overnight chill gives the filling time to firm up completely and makes slicing much cleaner and easier.
Serving Ideas and Flavors That Shine with Cannoli Cheesecake
Garnish the cheesecake with sweetened whipped cream, chopped pistachios, and extra mini chocolate chips just before serving to keep everything fresh and crisp. Fresh strawberries, raspberries, or cherries on the side add color and a tart contrast that balances the creamy filling beautifully.
For a richer crust, swap the vanilla wafers for crushed shortbread cookies or even crushed cannoli shells if you want a more traditional twist. You can also adjust the orange zest to taste, using less for a subtler flavor or swapping in a little lemon zest for a brighter, more citrus-forward filling.
If you prefer bars for easier serving at parties, press the crust and filling into an 8-inch or 9-inch square pan lined with parchment paper. Chill for at least 6 hours, then lift out the whole block using the parchment and slice into neat squares.
No-Bake Cannoli Cheesecake: Frequently Asked Questions
Can I use part-skim ricotta or does it need to be whole milk?
Whole-milk ricotta gives the filling a creamier, richer texture that’s closer to traditional cannoli filling. Part-skim ricotta will work, but the filling may taste slightly less rich and could have a slightly grainy texture. Make sure to drain it very well either way.
What’s the best way to keep the crust from getting soggy?
Baking the crust for 8 to 10 minutes helps it stay crisp and prevents it from absorbing moisture from the filling. If you prefer not to bake, chill the crust for at least 20 to 30 minutes to firm it up before adding the filling.
Is it okay to skip the orange zest or substitute another citrus?
Orange zest is traditional in cannoli fillings, but you can reduce it or leave it out entirely for a milder flavor. Lemon zest works well as a substitute and gives the filling a brighter, slightly tangier note that still complements the ricotta and chocolate.
How far ahead can I make this cheesecake before serving?
You can make the cheesecake up to 2 days ahead and store it covered in the refrigerator. The texture actually improves after an overnight chill. Wait to add whipped cream, pistachios, or other garnishes until just before serving to keep them fresh.
How to Store and Freeze Cannoli Cheesecake
Store the cheesecake tightly covered in the refrigerator for up to 3 days. For the best texture and appearance, wait to add whipped cream, pistachios, or other toppings until just before serving.
You can freeze the cheesecake whole or in individual slices for up to 1 month. Wrap it well in plastic wrap and aluminum foil, then thaw overnight in the refrigerator before serving. The texture holds up surprisingly well after freezing, though the whipped cream garnish should always be added fresh.
This cheesecake is actually better after an overnight chill, making it a smart dessert to prepare a day ahead for holidays, dinner parties, or any gathering where you want one less thing to worry about on the day of.

No-Bake Cannoli Cheesecake
Ingredients
Equipment
Method
- In a bowl, combine the crushed vanilla wafers, melted butter, and optional granulated sugar. Mix until the crumbs are evenly coated.
- Press the crumb mixture firmly into the bottom and slightly up the sides of a 9-inch springform pan.
- Bake the crust at 350°F (175°C) for 8–10 minutes, or chill it for 20–30 minutes until set.
- Pour the heavy cream into a large mixing bowl and whip until medium peaks form. Transfer to the refrigerator while you prepare the rest of the filling.
- In another large bowl, use an electric mixer on medium speed to beat together the well-drained ricotta, softened cream cheese, and mascarpone until smooth and creamy with no lumps.
- Add the confectioners’ sugar, orange zest, vanilla extract, and optional almond extract. Mix until everything is fully combined.
- Gently fold about a quarter of the whipped cream into the cheese mixture to lighten it. Carefully fold in the remaining whipped cream until the filling is airy and smooth.
- Fold in the mini chocolate chips until just incorporated.
- Spread the filling evenly over the prepared crust and smooth the top.
- Refrigerate the cheesecake for at least 6 hours, or overnight, to allow it to set completely for clean slicing.
- Just before serving, garnish with sweetened whipped cream, chopped pistachios, and extra mini chocolate chips as desired.