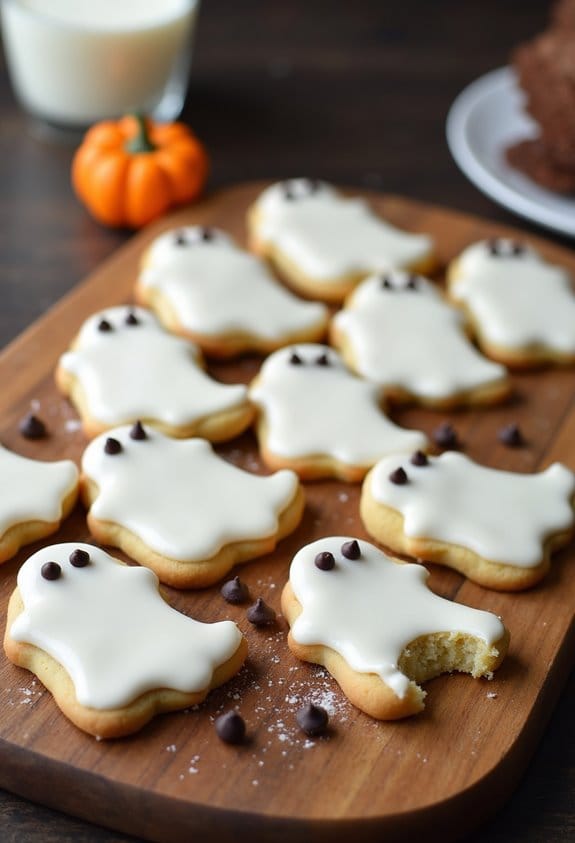
Why You’ll Love these Ghost Sugar Cookies
Baking magic happens when the aroma of vanilla sugar cookies fills your kitchen, especially when they’re shaped like adorable ghosts.
These hauntingly cute treats aren’t just seasonal showstoppers—they’re surprisingly simple to make.
I love how these cookies hold their shape perfectly, with crisp edges that define those ghostly silhouettes.
The subtle vanilla flavor pairs beautifully with the sweet icing, while those mini chocolate chip eyes add just the right touch of whimsy.
Best of all? The dough can be made ahead and frozen, ready whenever a cookie craving strikes.
Trust me, your friends will be begging for the recipe.
What Ingredients are in Ghost Sugar Cookies?
These ghost sugar cookies rely on pantry staples you probably already have on hand, which makes them perfect for last-minute Halloween baking sessions.
The beauty of this recipe is in its simplicity—classic sugar cookie ingredients come together to create a dough that holds its shape beautifully while baking, ensuring your ghosts look just as spooky coming out of the oven as they did going in.
- 1 cup unsalted butter, softened
- 1½ cups confectioners’ sugar
- 1 egg
- 1 teaspoon vanilla extract
- 2½ cups all-purpose flour
- ½ teaspoon baking soda
- ½ teaspoon cream of tartar
- ¼ teaspoon salt
- Mini chocolate chips (for the eyes)
- Icing ingredients (typically powdered sugar, milk, and optional corn syrup)
When shopping for these ingredients, quality matters in a few key areas. I always recommend using real vanilla extract rather than imitation for that warm, authentic flavor.
And don’t skip the cream of tartar—it might seem like an unusual ingredient, but it’s the secret to that perfect tender-crisp texture that makes these cookies so irresistible.
For the smoothest icing, sift your confectioners’ sugar to avoid any lumps that might clog your piping tip. Can you imagine anything more frustrating than a ghost with bumpy icing?
How to Make these Ghost Sugar Cookies

Making these ghostly treats is a straightforward process that yields hauntingly delicious results. Start by creaming together 1 cup of softened unsalted butter with 1½ cups of confectioners’ sugar until the mixture becomes light and fluffy. This might take about 2-3 minutes with an electric mixer—you want that airy texture that gives the cookies their tender crumb.
Next, beat in 1 egg and 1 teaspoon of vanilla extract until fully incorporated. In a separate bowl, whisk together your dry ingredients: 2½ cups of all-purpose flour, ½ teaspoon of baking soda, ½ teaspoon of cream of tartar, and ¼ teaspoon of salt. Gradually add this dry mixture to your wet ingredients, mixing just until a cohesive dough forms. Over-mixing here can lead to tough cookies, and nobody wants a tough ghost, right?
Once your dough comes together, flatten it into two discs (makes handling easier) and pop them in the refrigerator for at least 30 minutes. This chilling step isn’t optional—it’s essential for preventing spread and maintaining those crisp ghost shapes.
After chilling, roll the dough to about ¼-inch thickness on a lightly floured surface and cut out your ghost shapes. For extra-crisp edges, consider re-chilling the cut shapes on the baking sheet for another 10 minutes before baking. This little trick makes a world of difference.
Bake the cookies at 350°F for 8-10 minutes, or until the edges are just lightly golden. You don’t want to overbrown these ghostly figures—they’re supposed to be pale and spooky!
After the cookies have completely cooled (and I mean completely—warm cookies and icing are a recipe for disaster), prepare your icing by stirring the ingredients until smooth. For an extra touch of professional polish, add a tiny bit of corn syrup to give your icing that perfect shiny finish.
If the icing seems too thick to pipe or spread easily, add a drop more milk until you reach the desired consistency. Pipe or spread the icing onto your cooled ghost cookies, then quickly add two mini chocolate chips for the eyes before the icing sets. The contrast of the white icing against the dark chocolate eyes creates that classic ghostly look that’s both adorable and just a tiny bit spooky—perfect for your Halloween cookie platter.
Ghost Sugar Cookies Substitutions and Variations
While these ghost cookies are perfectly spooky as written, I’m a firm believer that recipes are just suggestions waiting for your personal touch.
Want to switch things up? Try almond extract instead of vanilla for a nutty twist, or add a tablespoon of lemon zest for brightness.
No cream of tartar? Substitute an equal amount of lemon juice or white vinegar. For a gluten-free version, swap in your favorite cup-for-cup flour blend.
And don’t feel limited to ghosts—this dough works beautifully for any holiday shape.
My niece loves when I add sprinkles to the dough for colorful confetti cookies.
What to Serve with Ghost Sugar Cookies
Halloween entertaining calls for a spooky spread to accompany these adorable ghost cookies. I love pairing them with a steaming mug of hot apple cider—the warm cinnamon notes perfectly complement the vanilla sweetness.
For the kids, try serving with chocolate milk topped with ghost-shaped whipped cream, a trick that never fails to delight my nieces.
Add some savory balance with pumpkin hummus and veggie “fingers,” or go all-in on the sweet theme with a caramel dip for apple slices.
My personal favorite? A scoop of vanilla bean ice cream sandwiched between two cookies. Heaven.
Final Thoughts
These ghost cookies have become a cherished tradition in my home, not just for Halloween but whenever we need a touch of whimsy at our table.
I’ve watched little faces light up as they decorate these buttery treats, pressing in chocolate chip eyes with determined fingers.
The recipe isn’t fussy, which I appreciate on busy days.
Remember to keep that dough cool, though—warm butter is the enemy of crisp edges.
What I love most? These simple sugar cookies bring people together.
There’s something magical about a plate of homemade ghosts that makes everyone, regardless of age, reach for seconds.
Ghost Sugar Cookies
Ingredients
Equipment
Method
- In a large bowl, cream together the softened unsalted butter with confectioners’ sugar until light and fluffy, about 2-3 minutes using an electric mixer.
- Beat in the egg and vanilla extract until fully incorporated.
- In a separate bowl, whisk together the all-purpose flour, baking soda, cream of tartar, and salt.
- Gradually add the dry mixture to the wet ingredients, mixing just until a cohesive dough forms. Be careful not to overmix.
- Divide the dough into two discs, flatten slightly, and wrap in plastic wrap. Refrigerate for at least 30 minutes.
- Preheat oven to 350°F (175°C) and line baking sheets with parchment paper.
- On a lightly floured surface, roll the chilled dough to about ¼-inch thickness and cut out ghost shapes with a cookie cutter.
- For extra-crisp edges, place the cut shapes on the baking sheet and refrigerate for another 10 minutes before baking.
- Bake for 8-10 minutes, or until the edges are just lightly golden. The cookies should remain pale for that ghostly appearance.
- Allow cookies to cool completely on the baking sheet for 5 minutes, then transfer to a wire rack to cool completely.
- Prepare the icing by mixing powdered sugar with small amounts of milk until smooth. Add a tiny bit of corn syrup for shine if desired.
- Pipe or spread the icing onto the cooled ghost cookies, then quickly add two mini chocolate chips for the eyes before the icing sets.
- Allow the icing to set completely before serving or storing.