

Why You’ll Love These Cranberry Brie Bites
These Cranberry Brie Bites are about to become your new holiday party MVP.
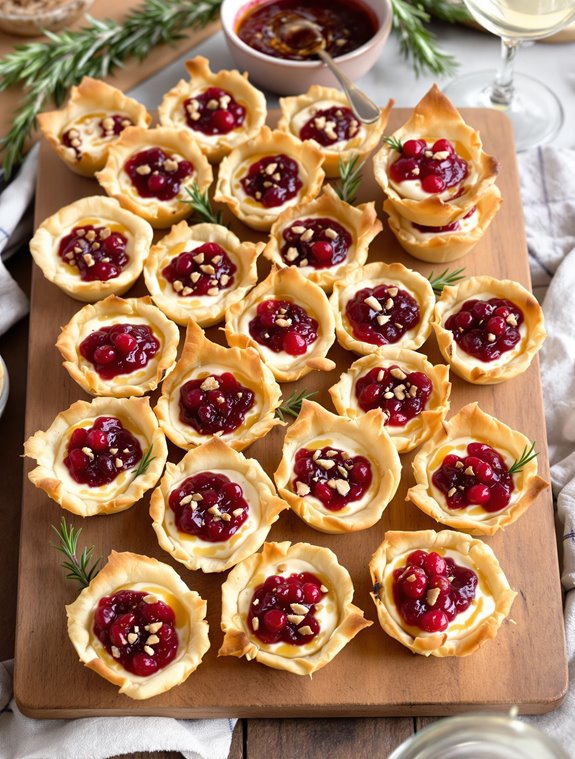
I’m talking about the perfect marriage of flaky puff pastry, creamy melted brie, and tangy cranberry sauce—all in one bite-sized package.
They’re ridiculously easy to make (just 15 minutes of prep) but look so fancy that guests will think you spent hours in the kitchen.
The rosemary adds a subtle earthiness that balances the sweetness, while optional nuts provide just the right crunch.
Did I mention you can prep them ahead? Trust me, your future self will thank you when the doorbell rings.
What Ingredients are in Cranberry Brie Bites?
- 1 sheet puff pastry (about 8 oz), thawed
- 8 oz Brie cheese (rind on or off), cut into small cubes
- ½ cup cranberry sauce (homemade or canned whole-berry)
- 1 tablespoon honey (optional, for extra sweetness)
- 1 tablespoon fresh rosemary, chopped (or ½ teaspoon dried)
- 1 tablespoon milk or plant-based milk (for brushing)
- 1 tablespoon chopped pecans or walnuts (optional, for topping)
-
Prepare your double pie crust and let it chill according to its recipe. Set your oven to preheat at 425°F (218°C).
-
In a medium saucepan over medium heat, melt the butter. Whisk in the flour and cook for 1 minute, stirring constantly.
-
Add the 1/4 cup water and 1 cup sugar, whisk to blend, and bring to a boil. Then lower the heat and simmer for 3 minutes, whisking frequently, until slightly thickened. Remove from the heat.
-
Combine the sliced apples and cinnamon in a large mixing bowl, tossing until evenly coated. Pour the warm sauce over the apples and stir to coat all the slices well.
-
Lightly dust your work surface with flour and roll out one portion of pie dough into a 12-inch circle. Carefully transfer it to a 9-inch pie plate, pressing gently into the bottom and up the sides.
-
Spoon the apple mixture into the crust, mounding the apples slightly in the center. Avoid letting the filling spill onto the crust edges to ensure a good seal.
-
Roll out the second portion of dough into an 11-inch round and cut it into 10 strips of even thickness. Arrange the strips on top of the pie in a woven lattice pattern.
-
Whisk the egg with 1 tablespoon of water. Brush the lattice and edges of the crust with this egg wash.
-
Bake the pie at 425°F (218°C) on the center rack for 15 minutes. Then lower the oven temperature to 350°F (177°C) and continue baking for another 45 minutes, or until the apples are soft and the filling is bubbling through the vents for at least 5 minutes.
-
Allow the pie to cool at room temperature for 1 hour before serving.
-
Place a piece of foil on the rack beneath the pie to catch any juices that might drip during baking.
-
Preheat your oven to 350°F (175°C). Grease two 8-inch round cake pans and dust them with cocoa powder. Line the bottom of each pan with parchment paper.
-
In the bowl of a stand mixer fitted with the paddle attachment, combine the flour, sugar, cocoa powder, baking soda, baking powder, and salt. Stir until evenly mixed.
-
In a medium bowl, whisk together the vegetable oil, buttermilk, eggs, and vanilla extract. Gradually stream in the hot water or coffee, whisking continuously so the eggs don’t scramble.
-
Pour the wet mixture into the dry ingredients. Mix on medium speed for 2–3 minutes or until well blended. The batter should be very thin.
-
Divide the batter evenly between the prepared pans. Use a kitchen scale to ensure an even amount in each pan, if desired.
-
Bake for 45 minutes, or until a toothpick inserted in the center comes out mostly clean.
-
Let the cakes cool in their pans for 10 minutes, then turn them out onto a wire rack to cool completely.
-
For the cherry liqueur syrup, combine the sugar and water in a small saucepan over medium heat. Stir and bring to a boil, then simmer for 1 minute. Remove from the heat, stir in the cherry liqueur, and let the syrup cool completely.
-
To prepare the whipped cream frosting, beat the cold whipping cream and powdered sugar in a chilled bowl until stiff peaks form.
-
For the chocolate bark or shavings (optional), melt the dark chocolate using a double boiler or in the microwave in short intervals. Spread the melted chocolate in a thin layer on parchment paper using a large offset spatula. Roll up the parchment from the short edge and chill on a baking sheet in the fridge or freezer until firm. Unroll to break the chocolate into shards or bark pieces.
-
To assemble the cake, cut each chocolate cake layer horizontally in half to create four thin layers.
-
Place one cake layer on your serving plate or cake stand. Brush it generously with the cooled cherry syrup.
-
Spread about 1 cup of whipped cream over the cake, then top with about 1 cup of halved cherries, gently pressing them into the whipped cream. Repeat this process with the remaining cake layers, cherry syrup, whipped cream, and cherries.
-
Frost the outside of the entire cake with the remaining whipped cream. Decorate as desired with chocolate bark or shavings, piped rosettes of whipped cream, and extra cherries.
-
Place chopped bacon in a large skillet over medium heat and cook until crisp. Use a slotted spoon to transfer the bacon to a plate, leaving the bacon fat in the pan.
-
Add diced onion to the skillet. Sauté, stirring every so often, until the onion is translucent, about 5 minutes.
-
Stir in chopped or shredded cabbage. Sprinkle in the brown sugar, salt, black pepper, and smoked paprika. Cook, stirring now and then, until the cabbage softens and becomes tender, about 7 to 10 minutes.
-
Return the cooked bacon to the pan and mix it thoroughly with the cabbage and onions. Serve hot.
-
Add the shredded carrots, apples, cranberries, and crumbled feta to a large bowl.
-
In a separate small bowl, whisk together the mayonnaise, apple cider vinegar, sugar, salt, and black pepper until the mixture is smooth.
-
Pour the dressing over the carrot and apple mixture in the large bowl.
-
Toss the slaw thoroughly until all the ingredients are evenly coated with the dressing.
-
Cover the bowl and let the slaw chill in the refrigerator for at least 30 minutes so the flavors can blend before serving.
-
Spread the panko breadcrumbs evenly on a large baking tray and mist with oil spray. Toast in a 180°C/350°F oven for about 5 minutes, or until lightly golden, watching closely to avoid burning. Transfer the breadcrumbs to a bowl and increase the oven temperature to 200°C/400°F.
-
Use a sharp knife to carefully cut a deep, wide pocket into each chicken breast, being careful not to slice all the way through. Place two slices of cheese on top of two slices of ham and roll them up tightly. Stuff the ham and cheese roll into the pocket of the chicken and fold the chicken over to enclose the filling. Secure the seam with toothpicks.
-
In a small bowl, mix together the paprika, salt, onion powder, garlic powder, black pepper, and, if using, cayenne pepper.
-
Set up three bowls: add the flour and half the seasoning mixture to the first, the beaten eggs to the second, and the toasted breadcrumbs with the remaining seasoning to the third. Coat each stuffed chicken breast in the flour, then the egg, then the seasoned breadcrumbs, making sure each piece is thoroughly covered at each stage.
-
Line a baking tray with foil and place a wire rack on top. Spray the rack with oil, arrange the coated chicken breasts on the rack, and mist the chicken with oil spray. Bake at 200°C/400°F for 25–30 minutes, or until the crust is deeply golden, crisp, and cheese is starting to ooze out. The chicken should be white and piping hot in the center.
-
While the chicken bakes, melt the butter in a medium pot over medium heat. Stir in the chicken stock, cream, Parmesan, mustard, and white pepper until smooth, then bring the mixture to a gentle simmer. Simmer for 5–6 minutes, stirring often, until the sauce thickens—it will thicken more as it cools. Taste and add salt if needed, then remove from heat.
-
Remove the toothpicks from each chicken breast, serve with the warm sauce poured over, and enjoy.
-
In a large Dutch oven or soup pot, melt the butter over medium-high heat. Add chopped onion, celery, and sliced carrots, and cook for 5–7 minutes, stirring occasionally, until softened and lightly golden.
-
Stir in the mushrooms and garlic. Cook for another 5 minutes, stirring occasionally, until the mushrooms have softened.
-
Sprinkle in the flour and stir constantly for about 1 minute, until the flour turns golden.
-
Add the chicken stock, sliced potatoes, salt, and black pepper. Bring everything to a boil, then reduce the heat to a simmer. Partially cover and cook for 12–15 minutes, or just until the potatoes are tender.
-
Stir in the shredded chicken, peas, corn, whipping cream, and parsley. Let the soup return to a gentle simmer and cook for another 5 minutes, until the peas and corn are heated through and tender. Taste and adjust salt and pepper if needed, then remove from heat. Garnish with additional parsley if desired.
-
Preheat your oven to 350°F (175°C) and grease an 8×8 inch baking pan.
-
In a medium mixing bowl, whisk together the pumpkin, eggs, vanilla, maple syrup, and pumpkin pie spice until fully blended.
-
Pour in the milk and gently stir until incorporated.
-
Add the oats and chia seeds to the wet mixture and mix until combined.
-
Transfer the mixture evenly into the prepared 8×8 pan.
-
Bake for 55–65 minutes, or until the center is set and no longer jiggles. In a metal pan, baking closer to 65 minutes may be needed.
-
Let cool slightly before serving. Store any leftovers in the refrigerator.
-
In a large bowl using a hand mixer or a stand mixer with the paddle attachment, beat the softened butter, brown sugar, and granulated sugar together at medium speed until the mixture is smooth, about 3 minutes. Add the eggs and continue mixing on high until fully combined, about 1 minute. Scrape down the bowl as needed. Mix in the vanilla extract and molasses on high speed until just blended. Set the mixture aside.
-
In a separate bowl, whisk together the flour, baking soda, cinnamon, and salt. Add these dry ingredients to the wet mixture and mix on low speed until everything is combined. Add the oats, raisins, and walnuts if using, and mix on low speed; the dough will be thick and sticky.
-
Cover and refrigerate the cookie dough for 30 to 60 minutes to chill (chill for the full hour if you’re worried about the cookies spreading too much). If you chill the dough longer, let it sit out at room temperature for at least 30 minutes before forming and baking.
-
Preheat the oven to 350°F (177°C). Line two large baking sheets with parchment paper or silicone baking mats.
-
Roll the chilled dough into balls, about 2 tablespoons of dough per cookie. Place them 2 inches apart on the prepared baking sheets. A cookie scoop can be helpful, as the dough will be sticky.
-
Bake the cookies for 12–14 minutes, or until the edges are lightly browned. The centers will appear very soft and slightly under-baked.
-
Remove the cookies from the oven and let them cool on the baking sheet for 5 minutes. Then, transfer them to a wire rack to cool completely. The cookies will continue to set as they cool on the baking sheet.
-
Make the Levain: Mix together the ripe sourdough starter, all-purpose flour, granulated sugar, and water for the levain. Knead until you have a unified dough ball. Cover and let sit at 78ºF for 10-12 hours until doubled and domed on top.
-
Prepare Sourdough Dough: Gently warm the milk to 90–100ºF. In a stand mixer with a dough hook, combine the ripe levain, warmed milk, and melted butter. Add the sugar, egg, salt, lemon zest, and most of the bread flour. Knead for 8–10 minutes, adding more bread flour as needed so the dough clings to one side of the bowl and isn’t very sticky. (If mixing by hand, knead 10–15 minutes.) The dough should be soft and smooth.
-
Bulk Fermentation: Place the dough in a covered container and let it ferment in a warm spot (78–80ºF) for 4 hours, keeping an eye on dough temperature. After 4 hours, the dough should be puffy and very elastic. Let ferment up to 30 minutes longer if needed until this texture is achieved.
-
Chill Dough Overnight: After bulk fermentation, cover and chill the dough in the refrigerator overnight. Continue with shaping and proofing the next day. (See notes for alternate timing options.)
-
Make Blueberry Compote: In a small saucepan over medium heat, combine the blueberries, sugar, and lemon juice. Cook for 5 minutes, mashing the berries as they soften. Add the cornstarch and whisk over the heat for 10–15 seconds until thickened. Transfer to a bowl and cool completely. (Compote can be refrigerated for up to 2 days.)
-
Prepare Lemon Filling: Just before shaping, take the dough from the fridge. Stir together the softened or melted butter, sugar, lemon zest, and a pinch of salt to form a thick paste.
-
Shape the Rolls: Line a 9×13-inch pan with parchment or use a nonstick pan. Roll the dough into a 16×12-inch rectangle. Evenly spread the lemon filling over the entire dough, right to the edges. Spread the blueberry compote over the lemon layer. Starting at the long edge closest to you, roll the dough up tightly and seal the seam. Place seam side down and slice the log into 8 equal pieces. Arrange the rolls in the pan—2 in the middle, and 3 along each side.
-
Proof the Rolls: Cover the pan and let the rolls proof in a warm (80–85ºF) place for 3–4 hours, until doubled and puffy. Do not bake before they have fully risen.
-
Bake: Preheat the oven to 350ºF. Bake 30 minutes, until cooked through. Check doneness by gently lifting the center roll; if needed, bake a few minutes longer until the centers are fully baked.
-
Mix Frosting: Use a hand mixer to beat together the softened butter and cream cheese. Add powdered sugar, lemon juice, lemon zest, and a pinch of salt. Mix for 2–3 minutes, scraping the bowl, until fluffy and light.
-
Spread the frosting over the warm rolls before serving. Enjoy!
- Choose whether to peel the potatoes or leave the skins on. If keeping the skins, scrub thoroughly and check for any green color under the skin. If peeling, use a vegetable peeler.
- Trim a flat side on each potato and place it on a cutting board flat-side down for stability. Slice the potato just over 1/4-inch thick, then cut those slices lengthwise into sticks for fries. Place cut fries into a bowl of cold water as you go to keep them from browning.
- Rinse the potato sticks in a colander for about a minute, then soak them again in fresh cold water for 10 minutes. Drain, rinse once more, and dry thoroughly with a kitchen towel.
- Fill a heavy-bottomed saucepan (at least 8 inches wide) or a deep fryer with enough tallow to reach a few inches up the sides. Heat to 325°F (163°C). Fry about half the potatoes for 5 minutes, stirring occasionally, then transfer to a paper towel-lined plate and let rest for 5 minutes. Fries will be very tender but pale in color at this stage.
- Increase oil temperature to 375°F (190°C). Fry the blanched fries for 3 minutes, stirring frequently, until golden brown. Move to a large paper towel-lined bowl, drain briefly, and immediately season with salt while hot so it adheres well.
- Serve immediately, plain or with dips like ketchup, mayonnaise, aioli, or cheese sauce. Enjoy!
When shopping for these ingredients, quality matters but doesn’t need to break the bank. Store-bought puff pastry works perfectly—no need to channel your inner French pastry chef. For the Brie, whether you keep the rind on is totally up to you; it softens when baked and some people love the earthy flavor it adds. The cranberry sauce can be your favorite holiday leftover or from a can, though I find the whole-berry version provides better texture. And don’t skip the rosemary—that little hint of herbal freshness is what elevates these bites from good to “can I’ve the recipe?”
How to Make These Cranberry Brie Bites
Making these festive bites is surprisingly simple, starting with preheating your oven to 375°F (190°C) and giving your mini muffin pan a light greasing.
You’ll begin by unfolding 1 sheet of thawed puff pastry on a lightly floured surface. Using a sharp knife or pizza cutter, divide the pastry into 24 equal squares. Don’t worry if they’re not perfectly identical—these are meant to be rustic and charming, not geometrically precise.
Next comes the assembly, which is where the magic happens. Gently press each pastry square into a mini muffin cup, creating a little pastry nest.
Place a cube of your 8 oz Brie cheese into each cup, then top with about ½ teaspoon of cranberry sauce from your ½ cup supply. If you’re feeling extra indulgent, drizzle a touch of that 1 tablespoon honey over the cranberry layer.
Sprinkle your 1 tablespoon chopped rosemary across all cups, followed by the optional 1 tablespoon chopped nuts if you’re using them.
Before popping them in the oven, brush the exposed pastry edges with 1 tablespoon milk for that golden finish.
The final step is simply patience—bake these little jewels for 13-15 minutes, or until the pastry puffs up and turns a beautiful golden brown. The cheese should be melty but not completely liquid.
What emerges is a perfect balance of flaky, buttery pastry, creamy cheese, and sweet-tart cranberry that somehow manages to hit all the flavor notes in just one bite.
And the best part? You can assemble these ahead of time and bake just before serving, making them perfect for entertaining when you’d rather be mingling than manning the kitchen.
Cranberry Brie Bites Substitutions and Variations
While the classic recipe for Cranberry Brie Bites is already a showstopper, don’t feel locked into using every ingredient exactly as written.
I often swap in camembert or goat cheese when I’m feeling adventurous—both melt beautifully. Not a cranberry fan? Fig jam, raspberry preserves, or even a savory onion chutney work wonderfully.
For an extra twist, try adding a tiny sprinkle of bacon bits or a drizzle of balsamic glaze.
Going plant-based? Vegan cheese alternatives have come a long way, and many puff pastry brands are accidentally vegan.
Me, I love adding orange zest to brighten everything up.
What to Serve with Cranberry Brie Bites
Cranberry Brie Bites pair beautifully with three complementary additions to round out your appetizer spread.
I love serving mine with a crisp apple and pear platter, thinly sliced and arranged in a fan pattern—the fresh fruit cuts through the rich cheese perfectly.
A small bowl of spiced nuts, warmed in the oven with rosemary and a touch of cayenne, adds wonderful texture contrast.
And don’t forget something bubbly! A glass of prosecco or sparkling cider, depending on your crowd, makes these bites feel extra special.
The combination creates a balanced spread that keeps guests coming back for more.
Final Thoughts
These little bites have truly become my go-to appetizer for any gathering worth its salt. The combination of flaky pastry, creamy brie, and tart cranberries creates pure magic in your mouth.
I’ve watched guests who claimed they “weren’t hungry” devour five in one sitting.
What I love most is their versatility. Dress them up for holiday parties or keep them casual for game nights. They’re impressive without being fussy, elegant without being pretentious.
And isn’t that what we all want from our entertaining recipes?
Trust me, these cranberry brie bites will earn you the title of “appetizer master” in no time.
The BEST Apple Pie Recipe
Ingredients
Equipment
Method
Nutrition
Notes
Tried this recipe?
Let us know how it was!
Black Forest Cake
Ingredients
Equipment
Method
Nutrition
Notes
Tried this recipe?
Let us know how it was!
Easy Fried Cabbage
Ingredients
Equipment
Method
Notes
Tried this recipe?
Let us know how it was!
Carrot Apple Slaw
Ingredients
Equipment
Method
Notes
Tried this recipe?
Let us know how it was!
Baked Chicken Cordon Bleu
Ingredients
Equipment
Method
Nutrition
Notes
Tried this recipe?
Let us know how it was!
Chicken Pot Pie Soup
Ingredients
Equipment
Method
Nutrition
Notes
Tried this recipe?
Let us know how it was!
Baked Pumpkin Oatmeal
Ingredients
Equipment
Method
Notes
Tried this recipe?
Let us know how it was!
Soft & Chewy Oatmeal Raisin Cookies
Ingredients
Equipment
Method
Notes
Tried this recipe?
Let us know how it was!
Blueberry Lemon Sourdough Sweet Rolls
Ingredients
Equipment
Method
Nutrition
Notes
Tried this recipe?
Let us know how it was!


