
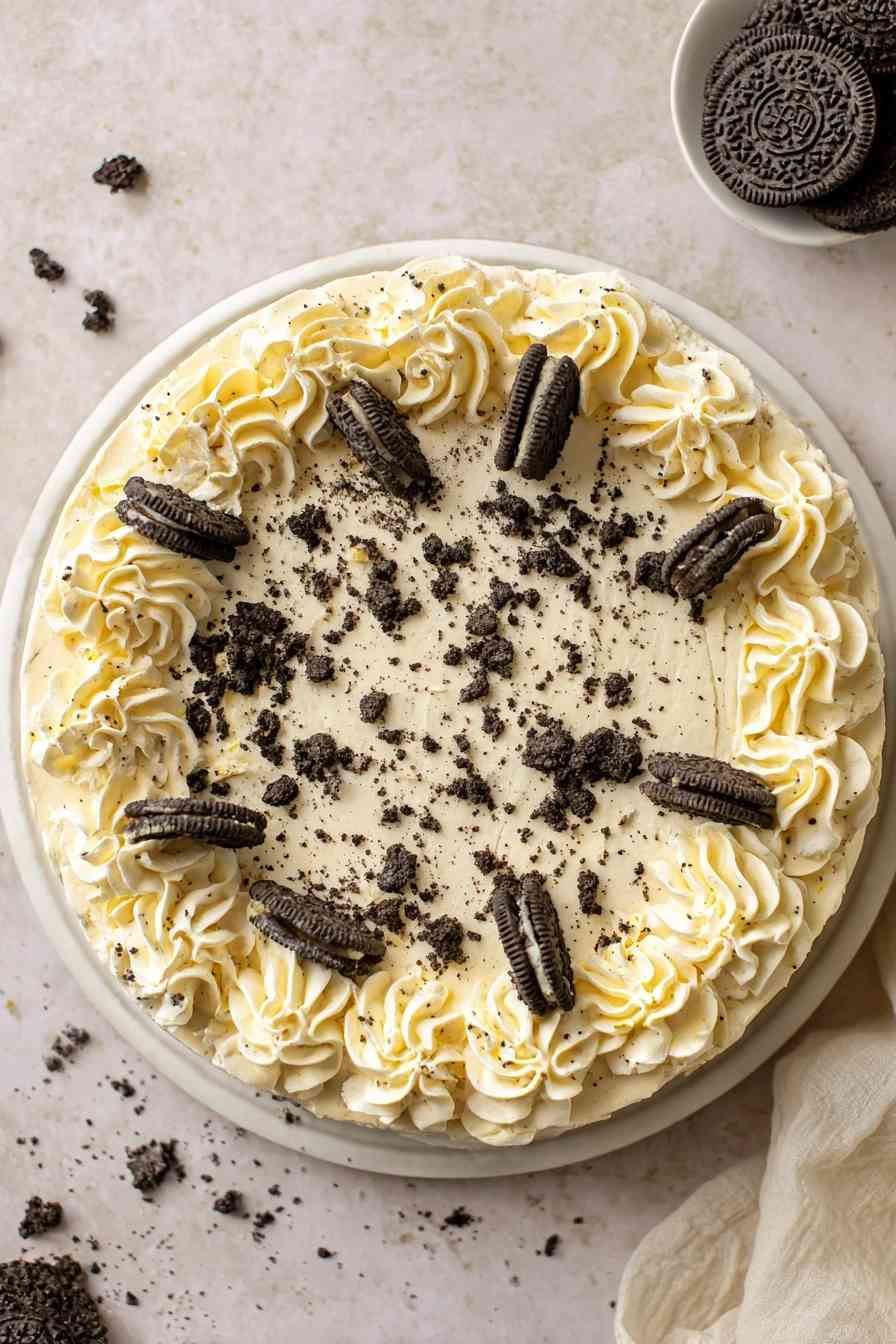
No-Bake Oreo Cheesecake uses Oreo cookies three ways: in the crust, filling, and topping.
This dessert delivers triple the Oreo goodness without turning on the oven. You’ll crush cookies for a buttery crust, fold chopped Oreos into a whipped cream cheese filling, and finish with a few more on top. The whole thing comes together in under 30 minutes of active work, then chills for several hours until it’s firm enough to slice cleanly.
Because the filling relies on whipped cream instead of eggs, the texture stays light and airy rather than dense. It’s a make-ahead dessert that holds beautifully in the fridge, which makes it practical for birthday parties, potlucks, or any gathering where you want to prep the day before. If you love Oreos and prefer skipping the bake time, this cheesecake checks both boxes.
What Goes Into No-Bake Oreo Cheesecake (And Why It Works)
The ingredient list is short, but each component plays a specific role in creating the right texture and flavor balance.
- Oreos – you’ll need 40 cookies total, with 24 going into the crust and 16 folded into the filling for bursts of chocolate crunch.
- Unsalted butter – binds the Oreo crumbs into a cohesive crust that holds its shape when you slice.
- Brick-style cream cheese – provides the tangy, rich base that defines cheesecake flavor and keeps the filling stable.
- Powdered sugar – sweetens the filling without leaving a grainy texture that granulated sugar can cause.
- Vanilla extract – rounds out the cream cheese flavor and adds warmth.
- Heavy whipping cream – whips into stiff peaks and lightens the filling, creating a mousse-like texture that sets firmly in the fridge.
Step-by-Step: Building Your No-Bake Oreo Cheesecake
STEP 1: Add 24 Oreos to a food processor and pulse until you have fine, even crumbs. Transfer the crumbs to a mixing bowl, pour in the melted butter, and stir until every crumb is moistened and the mixture holds together when pressed.
STEP 2: Line the bottom of a 9-inch springform pan with parchment paper. Scoop the Oreo mixture into the pan and press it down firmly into one even layer, making sure the edges are compacted. Chill the crust in the refrigerator while you prepare the filling.
STEP 3: Beat the softened cream cheese in a stand mixer or with a handheld mixer until smooth and free of lumps. Add the powdered sugar and vanilla extract, then mix until fully combined and creamy.
STEP 4: In a separate bowl, pour the cold heavy whipping cream. Start mixing on low speed, then gradually increase to medium-high until the cream thickens and stiff peaks form. Gently fold the whipped cream into the cream cheese mixture, or mix on low speed just until combined. Fold in the 16 chopped Oreos.
STEP 5: Remove the springform pan from the refrigerator. Scoop the cheesecake filling onto the chilled crust and spread it into an even layer, smoothing the top with a spatula.
STEP 6: If you like, pipe whipped cream around the edges and arrange a few extra Oreos on top for decoration.
STEP 7: Cover the pan tightly with plastic wrap and refrigerate for at least 4 to 5 hours, or overnight, until the filling is firm enough to slice cleanly. Release the springform, slice, and serve.
Tricks for the Creamiest, Dreamiest Oreo Cheesecake

- Use brick-style cream cheese, not the spreadable tub kind, which contains stabilizers that can make the filling runny and prevent it from setting properly.
- Whip the heavy cream until you see stiff peaks that hold their shape when you lift the whisk. Under-whipped cream will leave the filling too loose.
- Let the crust chill for at least 15 minutes before adding the filling. A cold, firm crust won’t shift or crumble when you spread the cheesecake layer on top.
- For the cleanest slices, dip your knife in hot water, wipe it dry, and cut in one smooth motion. Repeat between each slice.
Best Ways to Serve No-Bake Oreo Cheesecake
Serve each slice with a drizzle of chocolate syrup or a spoonful of chocolate ganache for extra richness. Fresh raspberries or strawberries cut through the sweetness with tartness. Pair it with hot coffee or cold milk for the full experience.
Oreo Cheesecake FAQs: Your Questions Answered
Can I use store-brand chocolate sandwich cookies instead of Oreos?
Yes, store-brand cookies work fine and will save you money. The flavor and texture will be nearly identical, though some off-brands have slightly less filling, which can affect the crust’s moisture level. Add an extra tablespoon of melted butter if the crumbs seem too dry.
Do I need to use brick-style cream cheese, or will whipped work?
Stick with brick-style cream cheese. Whipped or spreadable cream cheese contains air and stabilizers that prevent the filling from setting properly, leaving you with a loose, pudding-like texture instead of a firm, sliceable cheesecake. Soften the brick at room temperature for about 30 minutes before mixing.
How far in advance can I make no-bake Oreo cheesecake?
You can make this cheesecake up to two days ahead. The texture actually improves after a full overnight chill, as the flavors meld and the filling firms up completely. Keep it covered tightly in the fridge until you’re ready to serve.
What’s the best way to get clean slices?
Dip a sharp knife in hot water, wipe it completely dry with a towel, then slice straight down through the cheesecake in one smooth motion. Wipe the blade clean and repeat the hot-water dip between each slice to prevent the filling from dragging or smearing.
Is it possible to freeze this cheesecake for later?
Yes, this cheesecake freezes well. Wrap individual slices tightly in plastic wrap, then place them in a freezer-safe container or bag. Freeze for up to two months. Thaw slices in the fridge for a few hours before serving, and the texture will stay creamy.
How to Store and Keep Your Oreo Cheesecake Fresh
Store the cheesecake covered in the refrigerator for up to four days. The filling will stay creamy and firm, though the Oreos in the filling may soften slightly over time.
To freeze, wrap the whole cheesecake tightly in plastic wrap, then cover with aluminum foil. Freeze for up to two months. Thaw it in the fridge overnight before slicing. The texture holds up well, though the crust may lose a bit of its initial crunch.
Avoid leaving the cheesecake at room temperature for more than an hour. The whipped cream filling can soften and lose its structure if it sits out too long, especially in warm weather.
No-Bake Oreo Cheesecake
Ingredients
Equipment
Method
- Place the 24 Oreos in a food processor and pulse until they become fine crumbs. Transfer the crumbs to a mixing bowl, pour in the melted butter, and stir until well combined and all the crumbs are moistened.
- Line the bottom of a 9-inch springform pan with parchment paper. Pour the Oreo mixture into the pan, pressing it down firmly into a single, even layer. Refrigerate the crust while preparing the filling.
- In a large mixing bowl or stand mixer with a whisk attachment, beat the softened cream cheese until smooth. Add the powdered sugar and vanilla, and continue mixing until the mixture is creamy and well blended.
- In a separate bowl, whip the cold heavy cream. Begin at low speed and gradually increase to medium-high, beating until stiff peaks form.
- Gently fold the whipped cream into the cream cheese mixture using a spatula (or mix on low speed) just until fully incorporated. Fold in the chopped Oreos.
- Remove the pan from the fridge and spoon the cheesecake filling over the crust. Spread it evenly and smooth the top with a spatula.
- If desired, decorate the cheesecake by piping whipped cream around the edges and placing extra Oreos on top.
- Cover the pan tightly and refrigerate the cheesecake for at least 4 to 5 hours, or overnight, until the filling is fully set. Once ready, remove from the pan, slice, and serve.